|
|
|||||
 |
|||||
Q:How do you mark beds quickly and accurately for planting? |
|||||
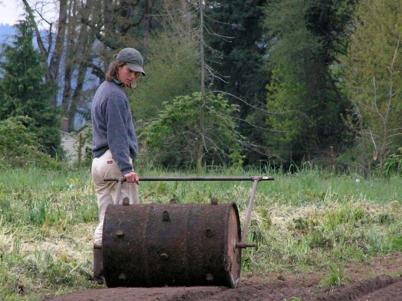
A: My favorite way to mark beds for both transplanting and direct seeding with a hand pushed seeder is to use a rolling bed marker.I've built a number of versions of rolling bed markers, from a hand pulled drum with individual dibbles, to a version mounted on a cultivating tractor built from old press wheels off of a Planet Jr. seeder and salvaged bolts from a wire spool which I wrote about in the Greenhorns book (Zoë, one of the editors of that book is pictured below with "the dibbler"). |
|
 |
||
Pre-marking beds is an extra step but it avoids any hesitation from the planting crew, or the person pushing the seeder. Beyond that it is essential for tractor cultivation to get the spacing between rows right, and getting the spacing within rows even really helps with getting even results in both maturity and size of plants. It also makes it easy to calculate the number of starts needed when transplanting. |
|
 |
||
Marking the bed with individual marks from a dibber, like the drum shown in the first photo, is good, but I’ve found that marking a grid is easier to see in bad soil conditions, and it also creates a straight line for a seeder to follow. I’m partial to creating marks about 12” in line, which is a convenient unit that can easily be used for planting at a variety of spacings. 12” spacing is most obvious, 6” spacing is just two plants per mark, and 24” is a plant every other mark. Even spacings like 8”, 4” and 18” are relatively easy to estimate (3 per two marks, 3 per one mark, and 2 per three marks for example). |
|
 |
||
The markers shown above I made for Sauvie Island Organics when I worked there.They've marked miles and miles of beds over the years.Rolling bed markers are relatively easy to make on the farm and I explain how to make one that goes nicely on the farm carts I’ve designed in this post.The cart with the marker below I made as a prototype for Skyline Farm in Portland, Oregon and it's been in use for a little over two years now. |
|
 |
||
You can also buy big dibblers to go behind the tractor and that are part of transplanting sleds from Rain-Flo. These may or may not actually speed up transplanting in terms of labor hours, but they are more ergonomic for large jobs than hand carrying flats, and bending over. They are also one of the few transplanters that will work through plastic mulch. The version shown below is farm modified at Dancing Roots in Troutdale, OR. |
|
 |
||
Article added March 2013 |
|
I add to this site because I like collecting this information and I’ve found similar sites incredibly helpful. I hope this site is helpful for you, and if it is, please consider a donation to help me spend more time putting up more. Thanks! |
other places you can find me |
|||||||
 |
 |
|||||||
© joshvolk.com |
|