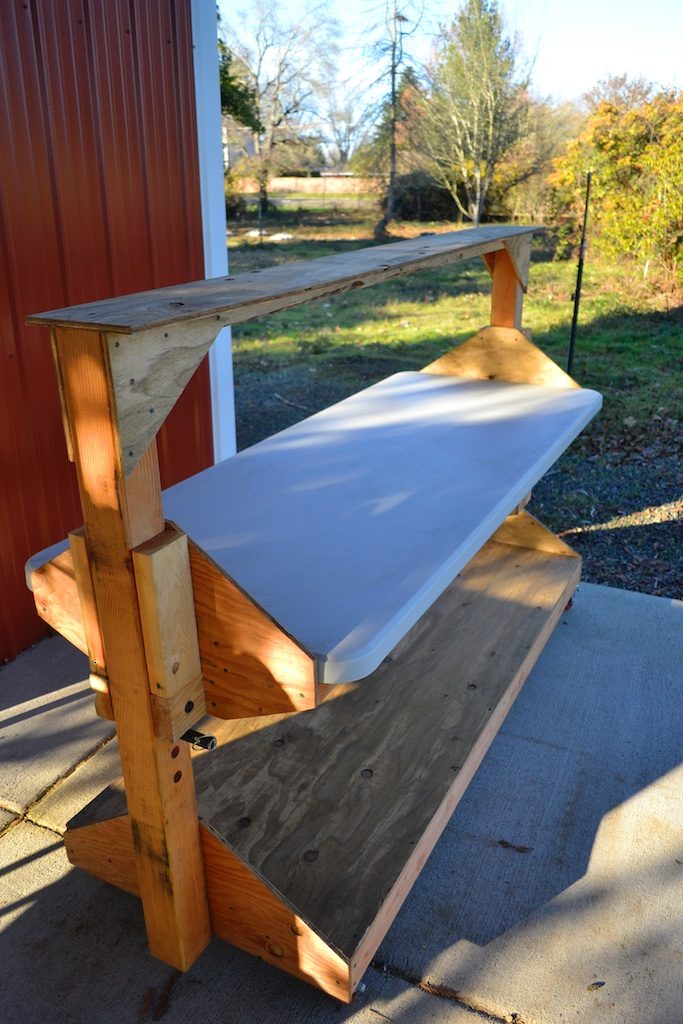
Background
In 2017 I worked with Nick Andrews and Heidi Noordijk at the North Willamette Research and Extension Center (NWREC) to help them develop a small wash and pack area to go with their Organic vegetable learning farm. The work was funded by a Clackamas Extension Innovation Grant. Part of the project was to design a few essential pieces of “furniture.”
I designed and built prototypes for three pieces and the packing table shown above is the first one I’m writing up here. You can find the write ups for the adjustable height spray table here and the harvest tote washer here.
The intention for the packing shed goes beyond just creating a functional space for packing vegetables out of the trial field, it’s also meant to be a testing ground for equipment, and a demonstration and teaching space for new and continuing farmers.
Basic Design
With that audience in mind I designed the table based on feedback from Nick and Heidi and with my personal experience packing vegetables on small farms with diverse crops. Here are the basic design features of the table.
The first and most basic feature is a large, smooth, non-porous work surface. The table uses a 6′ plastic table top, but could also be fitted with a stainless work surface (or wood). The intention was to have a tough work surface that is easily cleaned to make the table acceptable for GAP standards and FSMA rules. The frame of the rest of the table is wood which is relatively inexpensive, durable and easy to work with. The same design could easily be built from steel or aluminum which would increase the cost but might make it easier to clean.
The table has a large shelf below the table top which is suitable for holding packing supplies like wax boxes or produce waiting to be packed.
There is a smaller, high shelf which is suitable for holding labels, marking pens, tape and other tools. This is a good place to clamp work lights to help illuminate the work surface to reduce eye strain if additional light is needed.
The table is on wheels making it easy to roll on a hard smooth surface. The packing table can be moved as needed allowing flexibility with the pack shed work flow. The rolling table can also be used to move packing materials from one place to another, rolled out of the way when not in use, or when the floor needs to be cleaned.
Different packing operations and different farm workers often benefit from different work heights. The table top height is adjustable with two pins on the ends. The pins can be set in holes at different heights to support the table at lower or higher heights.
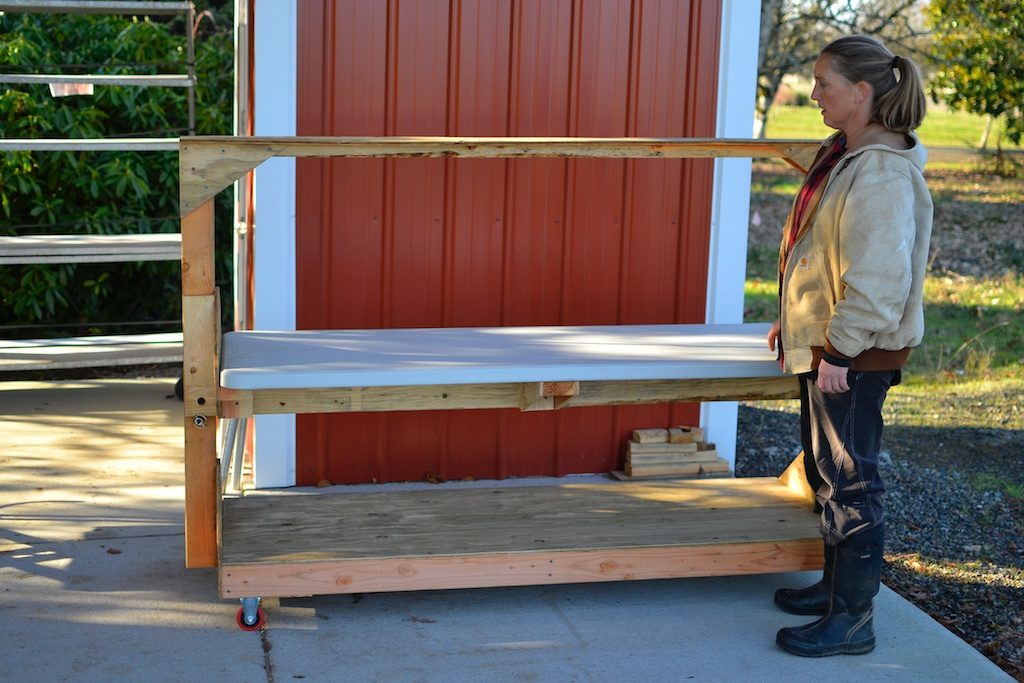
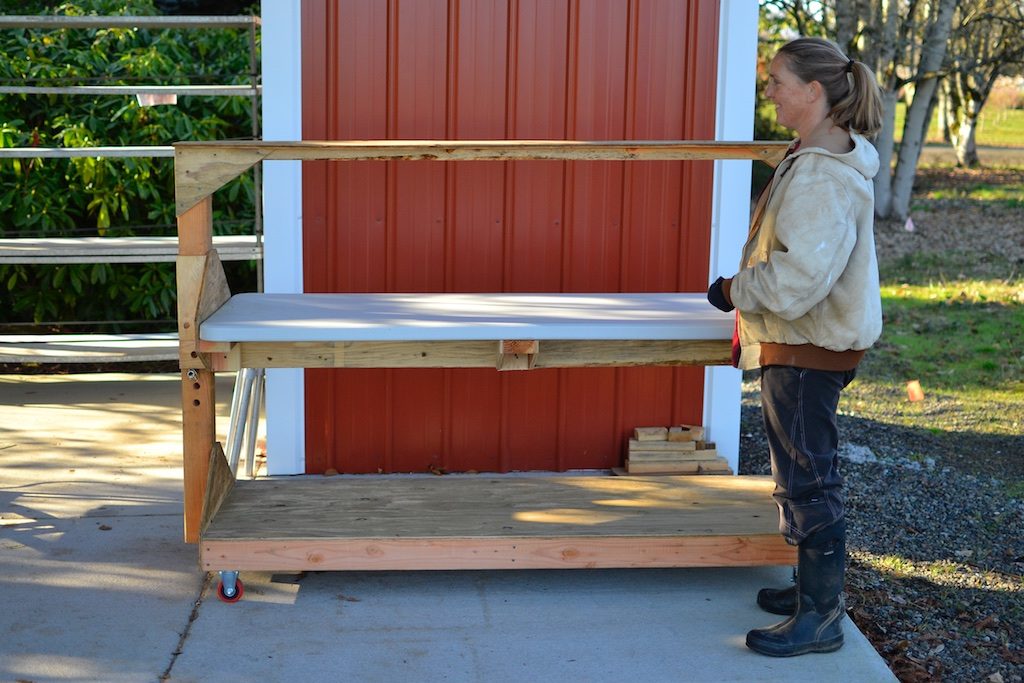
The final consideration was cost and accessibility. I wanted to keep the cost as low as possible, while still offering good functionality, and I also wanted to make sure it was possible to build with some basic tools and skills. The materials costs for the project (detailed below) were about $240 for me. It took me a while to work out the design, but the actual construction only took a long day (hard to say exactly how long actually as I was still working out some design details in there). With the sliding table feature it pays to take your time and be a little fiddly with getting everything just so.
Construction Basics
Construction of the table starts with building a simple plywood and 2×4 platform for the bottom shelf. This is set up on the casters, using blocks on the corners to add extra surface to screw the caster plates to.
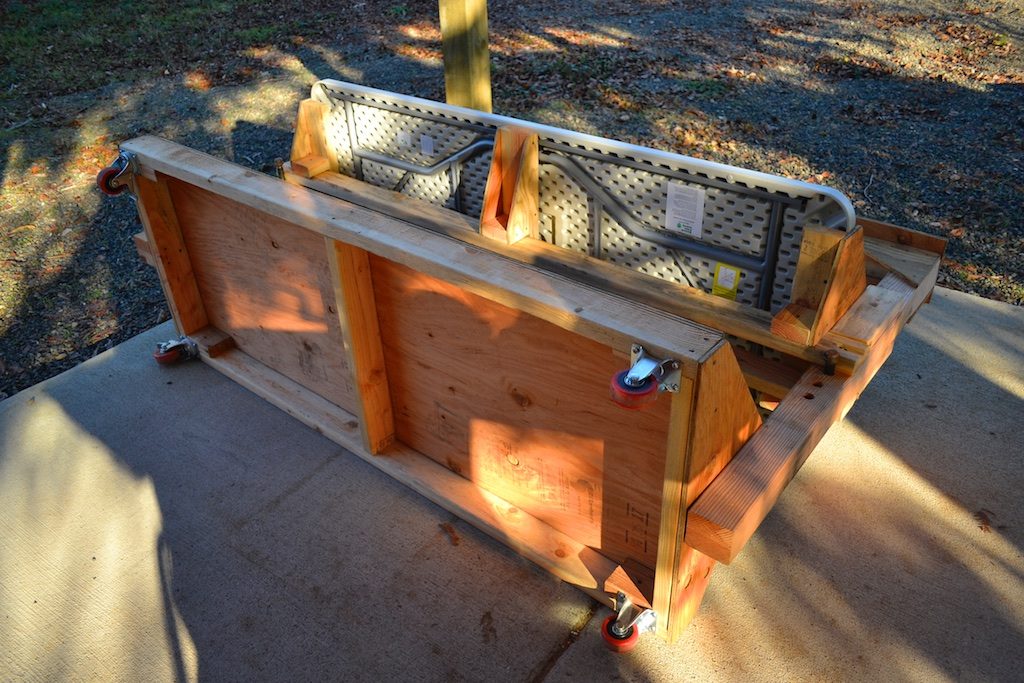
Two 4×4 uprights are attached to the base platform with plywood gussets and screws to keep them stable on the short axis. At the top of the 4×4 uprights is a 2×4 span that is reinforced with more plywood gussets to provide stability on the long axis of the table. On top of the 2×4 is a narrow plywood shelf.
A framework for the table top is built of 2×4 and plywood gussets. It is designed to slide up and down the 4×4 supports without wobbling. This frame supports the table top on the ends and in the center and it is attached with screws from the bottom so that it will not slide.
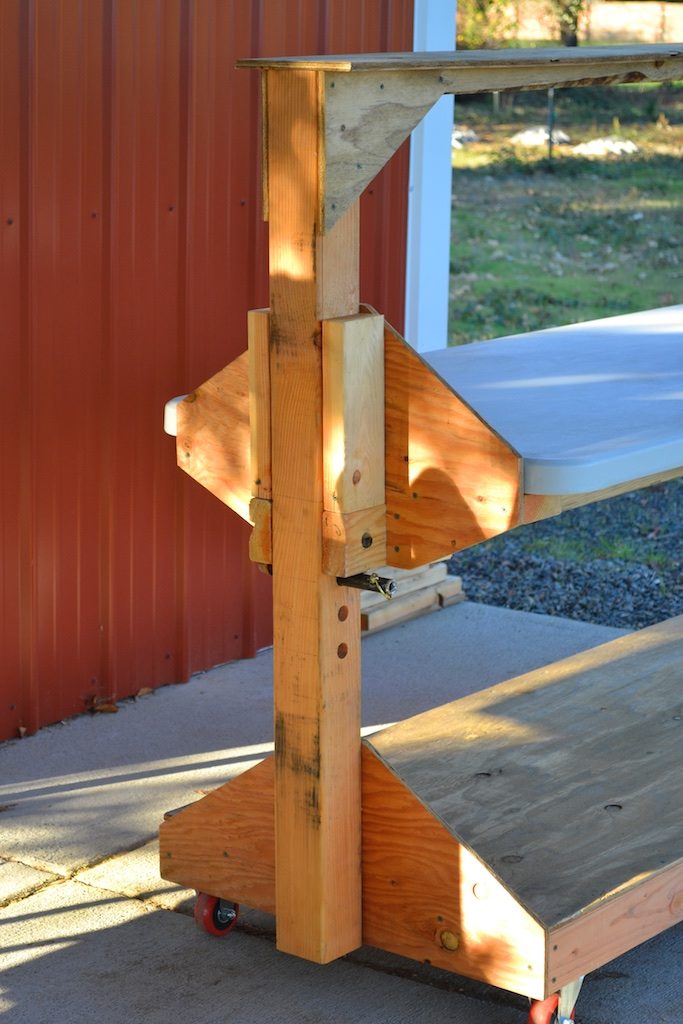
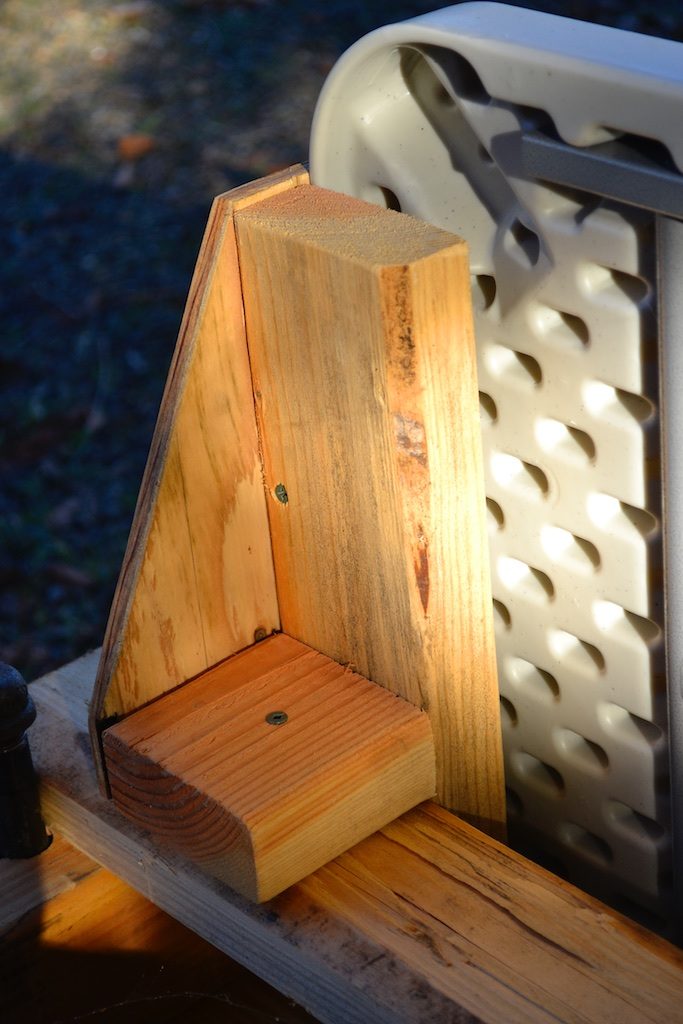
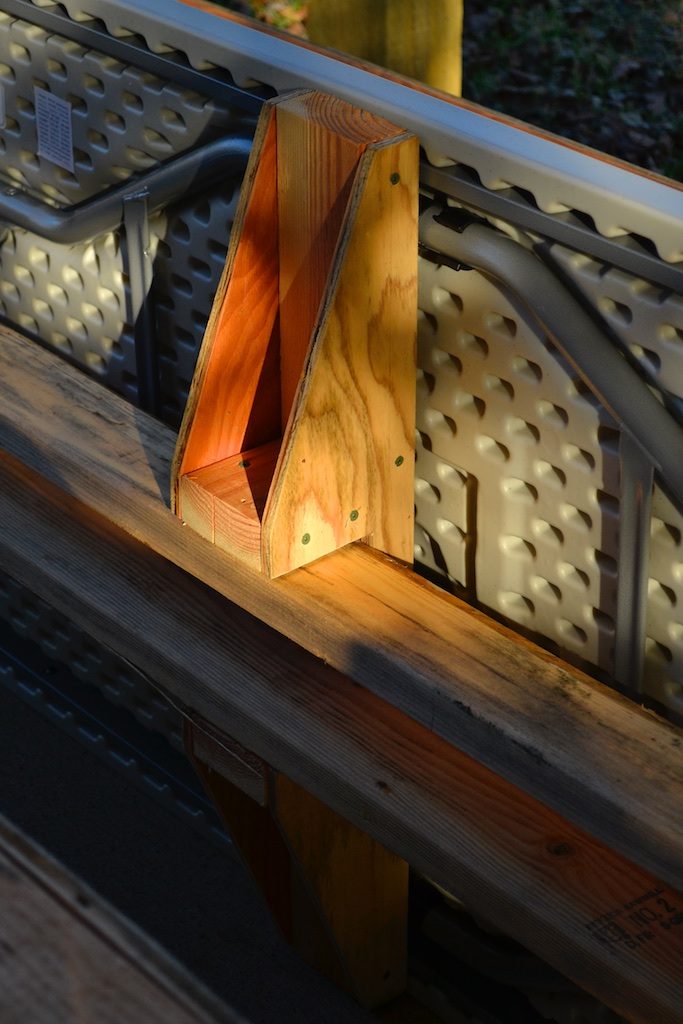
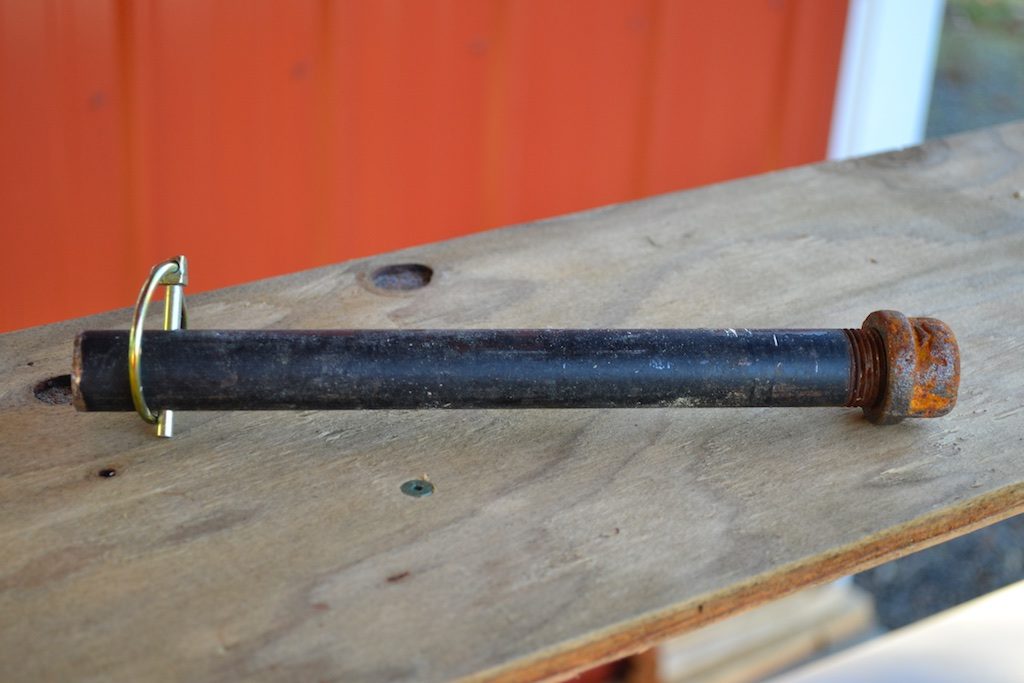
Heavy pins are made from ½” black pipe which insert into holes in the 4×4 uprights. The pins allow the table height to adjust by sliding the table top up or down on the uprights and then placing the pin in the closest holes below the desired height. The lynch pins and pipe caps keep the pin from coming out unintentionally.
The table surface that is used for the packing surface is a standard 6’ plastic folding table from National Seating. You can clearly see the underside of this table in one of the photos above. It is attached with four screws, so that it won’t slide out of place, but it can be easily removed and replaced, or used as a standard folding table.
Construction Details
I’m including a drawing of the table below with a few dimensions, the parts list and costs from the prototype, a rough cut list and more detailed step by step method for building the table. At the very end of this writeup there is a discussion of a few potential improvements or modifications I can see already.
I’m not giving a lot of dimensions, and you should double check the ones I do give. As I outline in the detailed step by step method, a lot of the dimensions should be checked against the actual dimensions of the table top you use.

| Part | Description | Source | Price |
| Screws | 1 ½” and 2 ½” deck screws for frame
1/4×2” lag bolts with washers for attaching casters |
Hardware Store | $10 |
| 4×4 | 8’ | Lumber Yard | $8 |
| 2×4 | 60’ | Lumber Yard | $29 |
| Plywood | One sheet ½” CDX | Lumber Yard | $22 |
| Folding Table | National Public Seating 30×72” 1000lb capacity folding table | Amazon | $89 |
| Double locking Casters | Two 3” non-marking double locking casters | Peachtree Woodworking Supply | $37.00 |
| Fixed wheels | Two 3” non-marking | Peachtree Woodworking Supply | $25.00 |
| Black pipe nipple | One 1/2×18” nipple | Hardware Store | $10 |
| Pipe cap | Two ½” caps | Hardware Store | $3 |
| lynch pin | Two 3/16 lynch pins | Hardware Store | $4 |
| Approximate parts TOTAL | $237 |
Approximate Cut List:
4×4
- (2) 48” uprights
2×4
- (2) 71.5” base shelf runners (these should actually be a hair over the length of the table top used)
- (3) 25” base shelf cross supports
- (1) 72.5” top bar (this should actually be the same length as the bottom shelf plus two gussets)
- (2) 79.5” table top supports
- (4) 8.5” upright side supports
- (2) 24.5” table top end cross supports (this is actually just under the width of the table at the very ends – mine had rounded corners so I only measured the straight part)
- (1) 29.5” table top middle cross support (this is actually just under the width of the table)
- (10) 3.5” blocks
½” Plywood (dimensions match 2×4 pieces they support and can vary slightly)
- (1) Top shelf
- (1) Base shelf
- (2) Base shelf end gussets
- (2) Table top end gussets
- (2) Table center support gussets
- (4) Top rail gussets
Assembly Instructions and Required Tools
Start by laying out all of the cuts for the plywood gussets and shelf pieces (DRAWING). These will all fit onto a single sheet of plywood, but only if you’re smart about how you make the cuts. A long (4’) straight edge and a string line makes this easier. I also used a framing square, measuring tape and pencil. For the long straight cuts I like to screw or clamp a straight board to the plywood to use as a cutting guide to get the edge very straight and smooth. With all wood cuts I also like to quickly soften the edges and remove any splintering with coarse, 80 grit, sandpaper wrapped around a wood block after making the cuts. To make the cuts I use a circular saw, but any type of saw that will cut straight will work.
Cut all of the 2×4 pieces for the base. If anything, you want the ends of the 2×4 base pieces to be just slightly proud of the plywood on the short edges. This will make the 4×4 and gusset attachment easier to get tight against the 2x4s. The platform needs to be just a hair longer than the table top that you’ll be using, and could be as much as 1/16-1/8” longer without causing any trouble. If it’s shorter the sliding mechanism won’t work.
Screw the bottom frame pieces together. I only use 2 screws per connection and I pre-drill to prevent splitting. When I screw on the plywood I make sure the frame is square at the corners and then add screws every 12-16” around the edges and through the cross supports in the middle of the platform.
Screw the gussets to the ends of the bottom platform. I use two screws at the outside corners, and four more screws along the length, avoiding the area where the 4×4 uprights will go.
I attached the wheels at this point, which worked well for me. I was working in a very cramped space and it was convenient to be able to roll the table around as I was working on it. The wheels could also be attached at any point after this in the process.
To attach the wheels I added scrap 2×4 blocks to the inside corners of the platform (see photo above). I then used one set to mark the hole locations for the screws and drilled pilot holes. The two locking casters are screwed onto one end with the ¼” lag bolts, and the fixed wheels go on the far ends.
Cut the 4×4 into two equal length pieces. The actual length is less important than that they are equal in length, and that the cuts are square (especially on the top side). Make sure to select a 4×4 that is straight and has no twist. This is important because the table slides on the 4×4 and it will bind if it is not straight and true.
You can drill the holes for the ½” black pipe pin now, or wait until the table top is installed and check the working heights you want to use. I used a 7/8” spade bit to drill the holes. If you have a drill press that will make a 3.5” deep hole this would be a good place to use it to keep the holes square. I just used a cordless drill. With spade bits it’s best to drill until the point is just protruding from the far end and then to drill into the far end using the small hole to center the bit. This prevents major tear-out that happens when the bit comes out the far side but keeps the bit aligned so the two holes from opposite sides line up properly.
Cut the 2×4 top rail to match the length of the assembled bottom frame with the two plywood gussets, or just a hair under. If the top rail is too long it will be impossible to make the uprights square.
Attach the 4×4 uprights to the end gussets keeping them centered and using a square to make sure they are square to the base platform. I find that getting close with Irwin Quick Clamps, setting one screw, then readjusting and clamping before setting a second screw helps with many of these joints, especially if you’re building the table solo. The first two screws should go into the gusset above the platform, one close to the top of the gusset and the other low, close to the platform. Wait to put the rest of the screws in until the joints at the top of the 4×4’s are secured.
Again, using only two screws per joint, attach the top rail to the 4×4 uprights with the gussets. Check the square and use clamps to help adjust and hold the work as you go. Once all of the gussets are tacked into place and the 4x4s are square to the frame start adding extra screws to stiffen the frame. For the top gussets I use 4-5 screws per edge. For the gussets at the base I use 4-6 screws above the base and then another 2-4 long screws that go through the 2×4 at the base, through the gusset and into the 4×4.
Attach the top shelf, centering it to the top rail. I use two screws on the ends at the corners of the 4×4 and then zig-zag screws down the length every 10-12”.
Putting together the sliding support frame for the table top requires a bit of fiddling to find a good balance between sliding easily and not wobbling excessively. If you’ve already drilled the holes for the pins in the 4×4 you can make the pins now and use them to help with the next steps.
To make the pins, cut the black pipe nipple in half. This can be done with a hacksaw, or an abrasive wheel. If you have an abrasive grinder use that to soften the edges of the cut. Drill a hole through the pipe about ½” from the cut end of each half. Start with a small bit to drill a pilot hole, maybe 1/8”. Using a center punch to mark the start of the hole will help keep the bit from wandering. When drilling steel, use less rotational speed and more downward pressure than when drilling wood, and definitely use a sharp drill bit that is rated for cutting steel. Once the pilot hole is drilled use a ¼” bit to drill a hole that your lynch pin will fit into. I did this with a cordless drill and the pipe clamped firmly to a table. If you have a drill press this is another good place to use it. Finish the pins by screwing the caps onto the threaded ends.
Insert the pins in the corresponding holes and rest the long rails for the table support on them. If you haven’t drilled the holes yet you can make lines at the same elevation, close to an average table height you think you’ll want to use on both of the 4×4 uprights. Then use a Quick Clamp (or any other kind of clamp or even just nails or screws) clamped to the 4×4 at that level so that the rails have something to sit against. Put a thick piece of paper board, or even better, three thin pieces of paper board (from a cereal box for example) between one of the rails and the 4x4s to shim it out a bit and then clamp the rails to the 4x4s. Make sure the shim material sticks out the on the outside so you can pull it out when you’re finished with it. If you have three pieces the middle piece will be the easy one to pull out and then the other two should come out easily. Don’t let the shim material stick into the area where the gussets will go.
Fit the side gussets over the two 2×4 rails and clamp them to the 4×4 uprights to keep them vertical. Use a piece of paperboard shim behind one of the two gussets to set it off of the 4×4 slightly.
Using two screws and pre-drilled holes attach blocks to the rails, flush against the gussets. Screw another pair of blocks in the center of the rails. Screw the three 2×4 cross supports to both rails, making sure to put the longer one in the center and centering all of them. You only need to put one screw through each rail to support connection to hold these in place.
Next, screw the end gussets to the cross supports and the blocks and add the gussets to the center support. Use at least two screws per block and 3-4 screws per side on the cross supports.
Add the vertical blocks to the end gussets, using the same shim materials to maintain a good spacing. Screw those blocks to the gussets and then put a toe-screw at an angle through the bottom of the block into the end of the rail to keep the block from twisting.
At this point, if you’ve measured everything correctly the folded table should slide onto the cross supports and be snug, or at least close to the end gussets. Center the table on the supports and then drive screws that are just long enough for a few threads to penetrate the plastic through the underside of the cross supports and up into the bottom edge of the table. This will hold the table top from sliding off of the supports. Those screws can be easily removed to allow the table to be used as a regular table, or to replace it when the surface is excessively worn.
If you haven’t drilled the holes in the 4x4s for the pins yet, find your ideal working heights now and make marks. You’ll want to drill the holes far enough below those marks so that the rails rest on the pins when the table is at that height. Make sure the holes are square to the uprights. One clue when using a spade bit is that the when the large spade first contacts the wood surface it makes a full circle all at once. If the bit is tipped it will start scribing an incomplete circle when it first contacts the wood. You can use a speed square to sight against the bit. This is a fairly critical hole and because it’s so long there’s not a lot of room for error here. If you’re unsure of your ability to drill a square hole (meaning square to the surface), use a guide or a drill press.
Potential Future Improvements
Initially my plan was to have the black pipe pins go through both the 4×4 uprights and the 2×4 table top supports in order to positively capture the position. Drilling such a large, long hole accurately turned out to be tricky and so I fell back on just drilling through the 4×4. This means the table top sits on top of the pins but can lift. It’s unlikely this will create problems, but there might be an improvement to be made here for more positive attachment.
A wooden dowel might be less expensive than the black pipe for pins but it would likely not insert as smoothly. A tapered pin might be a good way to hold the table but it would be much more tricky to make.
The balance between sliding easily and wobbling with the table top is a delicate one and it will be interesting to see how the joints hold up long term. Making the table top a fixed height would greatly simplify the construction phase. I will be curious to see how the frame shifts through the year with temperature and humidity changes and as the wood cures. This may end up having a negative (or positive) effect on the adjustable height feature depending on how much the raw wood expands and contracts.
This cart has a lot of potential for customization for special needs, places to hang or hold tools specific to crops grown by different farms, special shelves or outlets for electronics or scales, and dividers below for different box sizes or packing materials.
I don’t usually find it necessary to treat or finish wood surfaces that I use on the farm. As long as it dries out regularly standard construction grade fir does not seem to rot or splinter in my experience. Finishing the surfaces might have some benefit but it also has drawbacks: it takes more time and expense to put on a finish (like oil or paint), the finishing materials are often somewhat toxic, both when applied and when manufactured, and potentially if they scrape off during use. When I do use a finish I prefer raw linseed oil, a finish that is relatively inexpensive, non-toxic, and easy to re-apply when needed.
For wheels I chose to use two fixed wheels and two double-locking casters. Double-locking casters don’t roll and also don’t pivot when locked, but there is still a bit of wiggle with them. Using four double-locking casters would make rolling the cart into position in tight spaces easier but means you’d need to lock four casters instead of two. Even locking one with this design keeps it pretty stable, not the case if you have four. The table, without anything on it, is light enough that two fixed wheels and two leg extensions would probably be enough to make the table moveable and would be less expensive. One end would need to be raised, to roll the table, a bit like a wheel barrow, and it would be stable when it was set back down. This would save money on wheels, and might add some stability, but would make it a bit harder to move, especially if the shelves or table top were loaded with materials.
If you build one of these and/or have suggestions for improvements I’d love to hear about it. Please e-mail me.
