This site is a bit of an add on to my slowhandfarm.com site and has been my way of sharing some of my thinking and opinions about farming, tools, and a few other odds and ends for a number of years now.
In 2018 the site, along with a few of my other sites – including farmhandcarts.com – was taken down by a hacker. It wasn’t properly backed up and I’ve managed, with some help, to restore most of the content here – but a lot of photos are still waiting to be reloaded. Basically I’m short on time to maintain and rebuild the site.
A major goal of mine is to do more writing and to get more information out to farmers and eaters alike in 2020. How much of that work ends up here depends on funding (personally I’d like all of it to be here, free and accessible to all with access to an internet browser).
If you scroll way down to the bottom of this page there’s a button where you can donate funds to help with the site or to order a copy of my book, Compact Farms. I’m also part of a group that has a campaign for crowd funding a research trip to Italy right now and I’d love it if you’d pass that information around and toss a few bucks our way to help us bring back more information on chicories from the epicenter of chicory development.
Information on the site is a bit spread out right now – something I’d also like to fix eventually. Wander around and you’ll find lots of photos and writing and resources, currently not very well organized.
Definitely let me know if you have questions – any sort of questions. I prefer to write about questions that will actually help people. I’m also more than happy to write custom articles to answer your very specific questions. (Donations towards that end move those up in what is currently a pretty endless queue and you’ll be doing the rest of the folks who come looking for the same answer a favor, too. When considering how much to donate for an answer think about how long it would take you to write one up, multiply that by how much you make per hour, and then consider doubling that to help chip in for some overhead as well – or just chip in whatever you can afford, making money is not my primary goal here, just a necessary evil.)
On that note, thanks for stopping by and I hope I haven’t scared you away. There’s plenty of good info here, really – and it really is all given freely with best hopes that you’ll put it to good use and share it widely.
If you’ve been on many of my sites anytime in the past few months you couldn’t help but notice that they don’t look quite right and a lot of the content is inaccessible.
For some unknown reason a hacker deleted all of my files.
I’m slowly putting things back together now. The photo journals should be back up by the end of the day. I’ll work on getting all of the other content photos back up as I have time.
I did figure out, I think, how to properly back up the website so this doesn’t take so long if it ever happens again, but it’s making me question how much time I put into the site. Mostly those thoughts are that I should probably figure out a way to put even more time into getting content up here. We’ll see what happens.
If you find particular parts of the site you’d like rebuilt first, let me know and I’ll take those votes into consideration as I allocate my limited time. In the meantime, thanks for your patience.
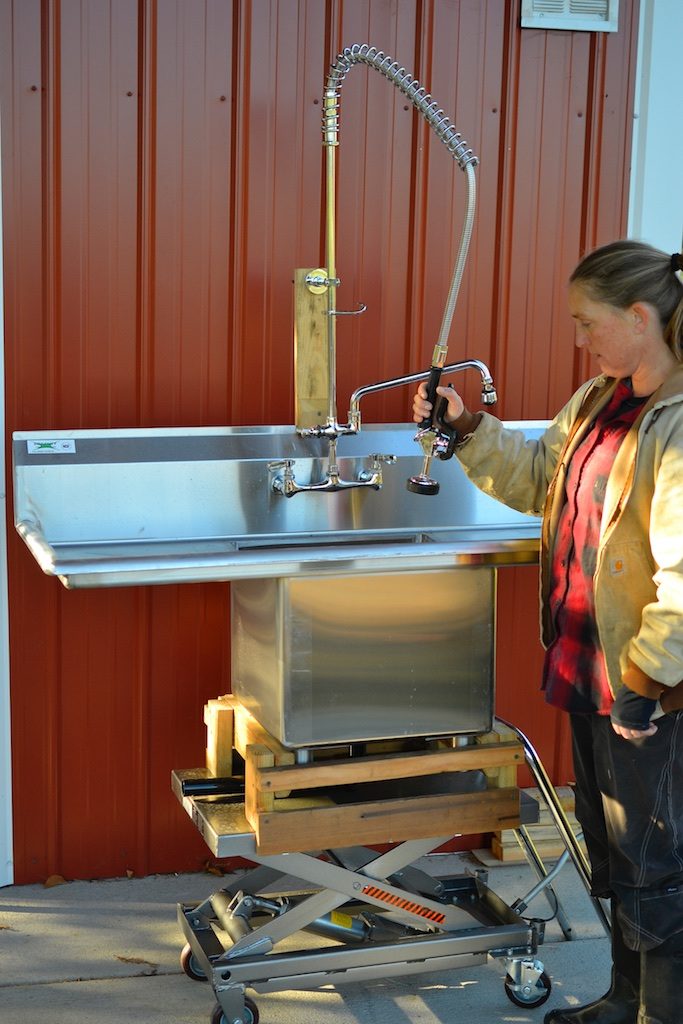
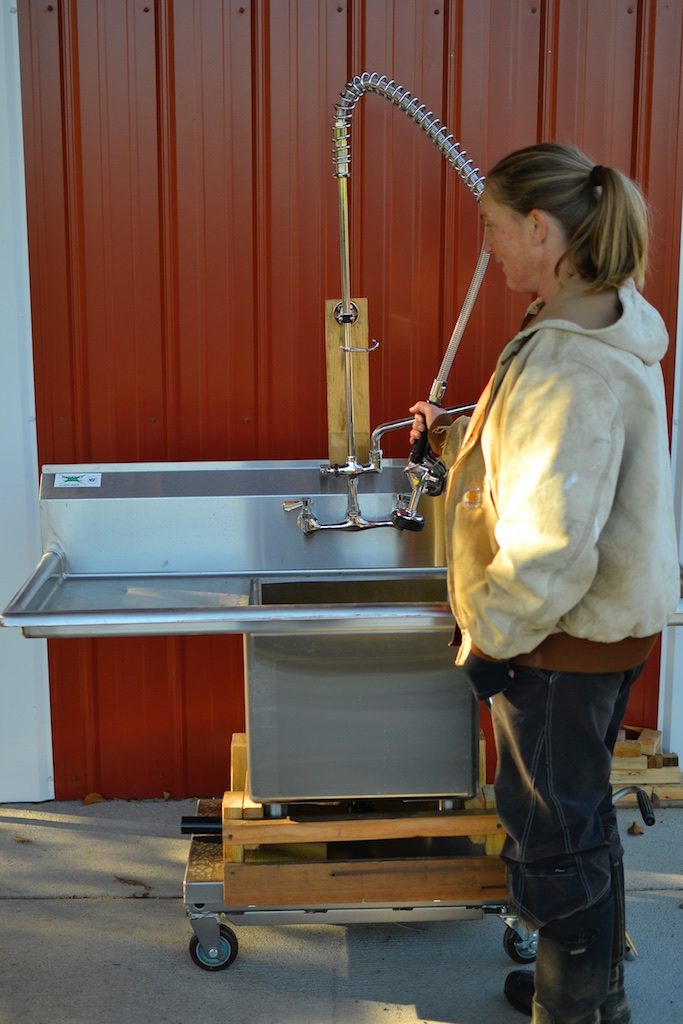
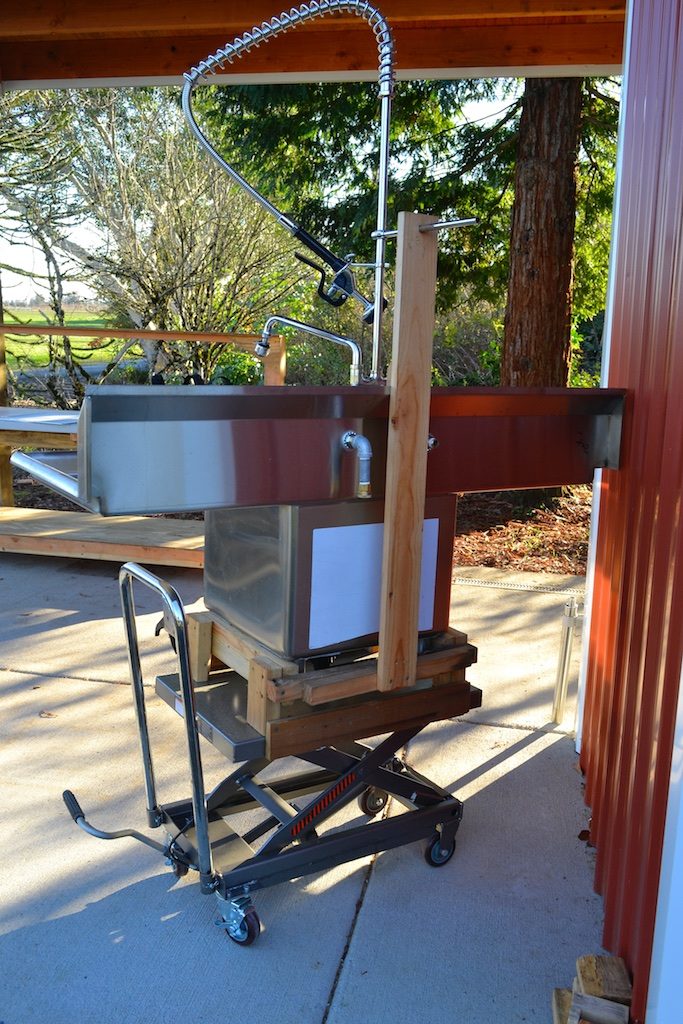
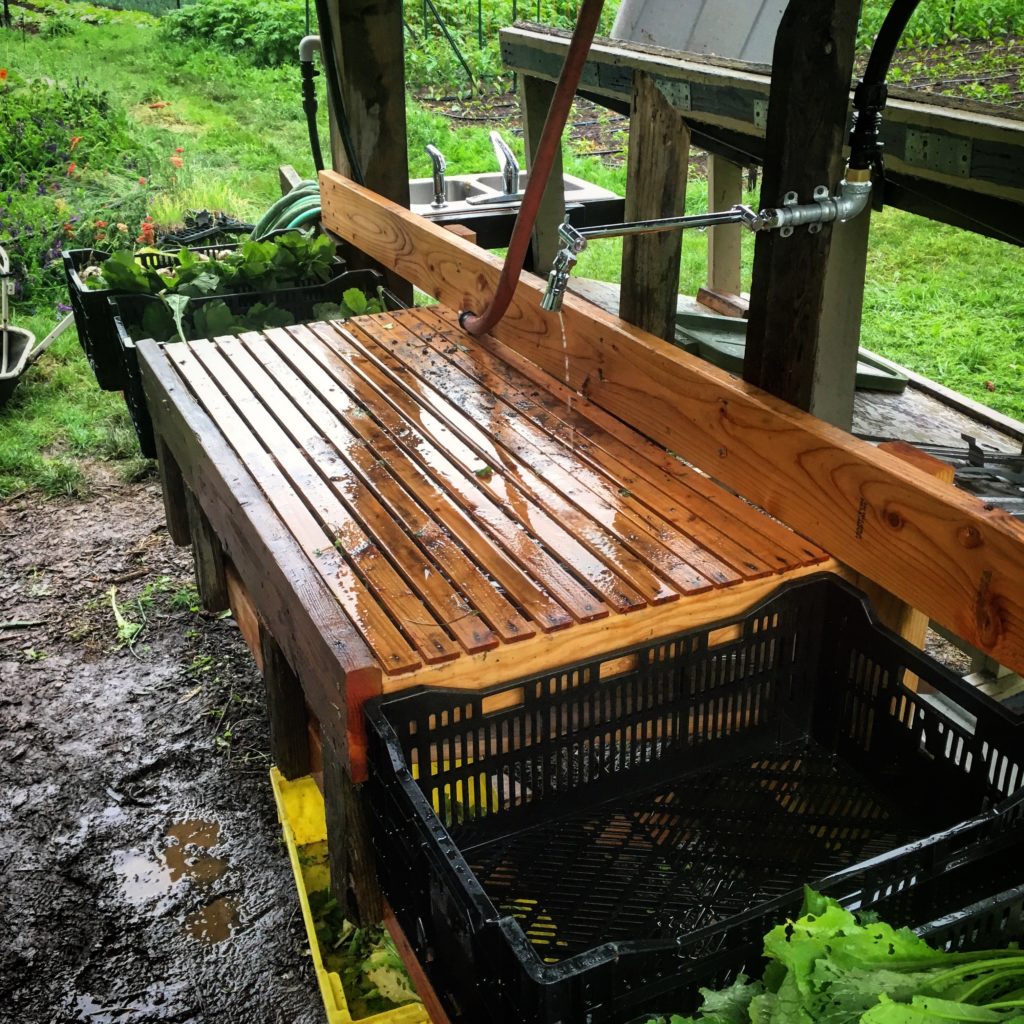
Labeled an adjustable height spray table, this is obviously actually a restaurant sink which is mounted on a lift cart. Read below to find out why.
Background
In 2017 I worked with Nick Andrews and Heidi Noordijk at the North Willamette Research and Extension Center (NWREC) to help them develop a small wash and pack area to go with their Organic vegetable learning farm. The work was funded by a Clackamas Extension Innovation Grant. Part of the project was to design a few essential pieces of “furniture.”
The intention for the packing shed goes beyond just creating a functional space for packing vegetables out of the trial field, it’s also meant to be a testing ground for equipment, and a demonstration and teaching space for new and continuing farmers.
Basic Design
The initial request for this piece of furniture was something where vegetables can be sprayed down, cleaned and sorted. I based the design loosely on tables that I’ve built and used on several farms. Those tables were primarily made from wood, which is relatively inexpensive and easy to work with. It is unclear if it will be acceptable under the FSMA rules, thus the preference for this table was stainless steel. Stainless steel is a material that is definitely acceptable under any food safety rules. I also tried to incorporate adjustable height. Ergonomics is important and frequently farms have users of widely varying heights. I wanted the table to be quickly and easily adjusted to any users ideal working height. The table rolls so that it can be easily moved on a concrete slab allowing the work space to be quickly reconfigured and the floor beneath the table to be cleaned.
Tables I’ve designed and used extensively in the past have been 4’ wide which is roughly an arm span, allowing the user to reach both ends of the table without much movement. Usually I build shelves on the ends that allow the largest harvest totes used by the farm to sit flush with the table top, making it easy to move dirty product onto the table, and clean product off the other end. This table does not have the incorporated shelves (see Potential Future Improvements section for more on that).
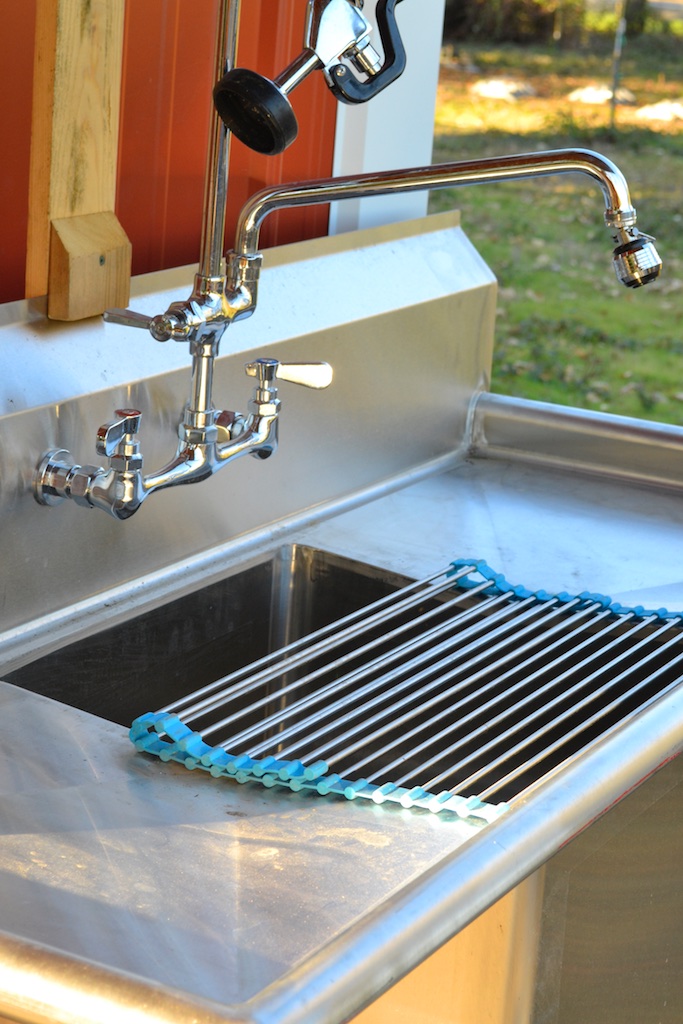
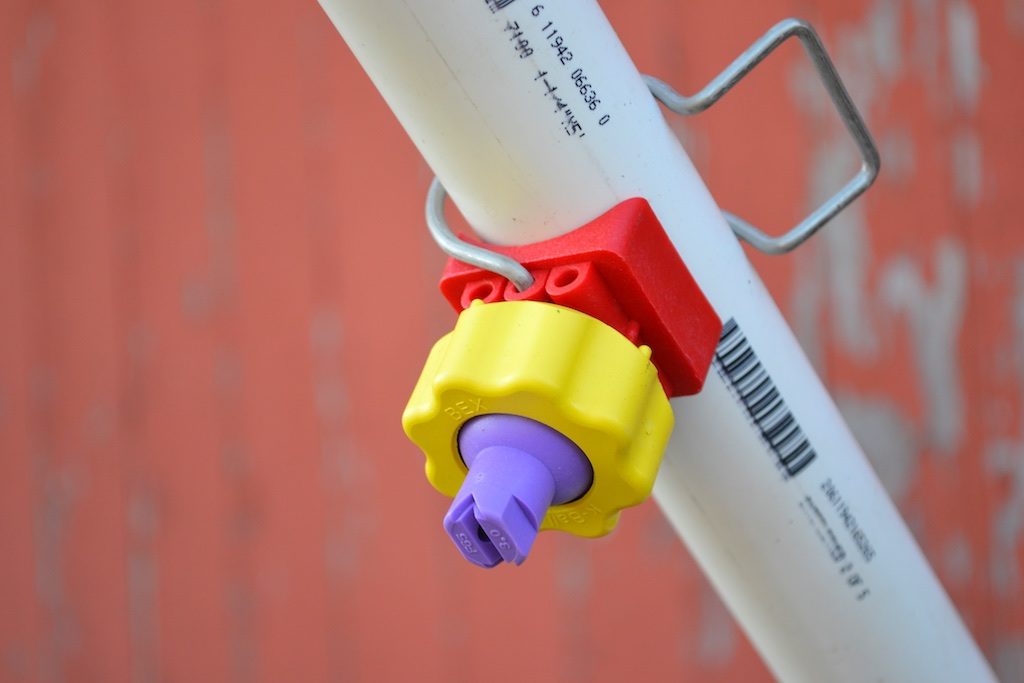
I like to incorporate both a hanging hand operated sprayer and a hands-free, adjustable sprayer onto tables. The hands-free option allows the user to move product across the table with both hands while still spraying. With a hands-free sprayer, hands, or hand-held brushes, can be used to help rub soil and other debris off of the produce in addition to the spray without having to constantly pick up and put down the sprayer.
The hanging, hand operated sprayer is always conveniently located and never is in danger of touching the ground where it is easily contaminated. It is useful for spraying all corners of the table if the user prefers to dump a large pile of produce, or for cleaning the table after washing the produce.
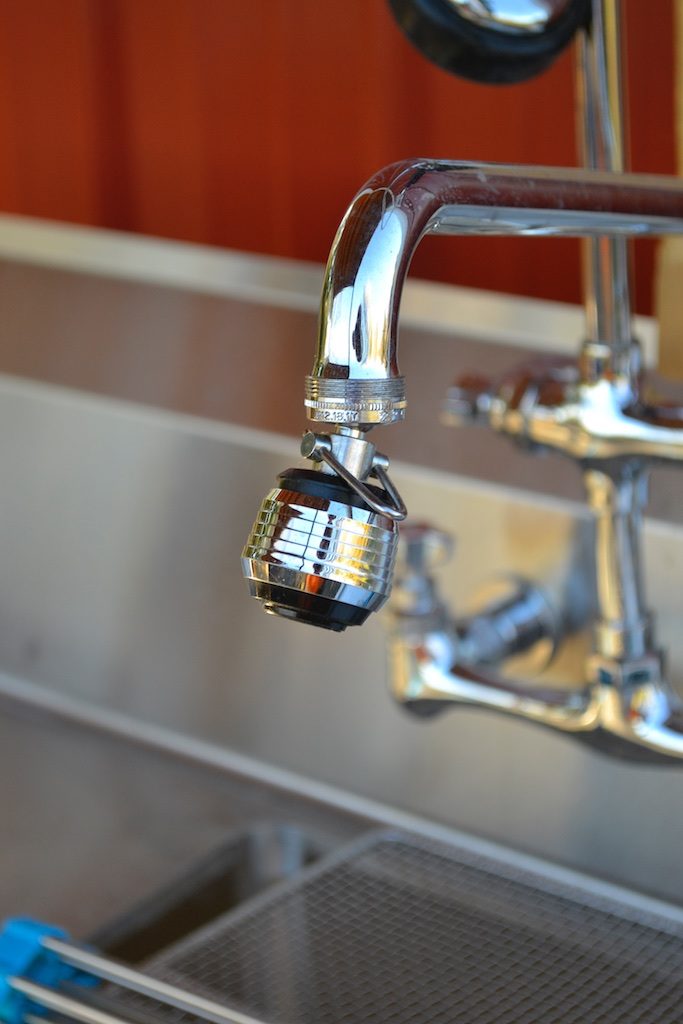
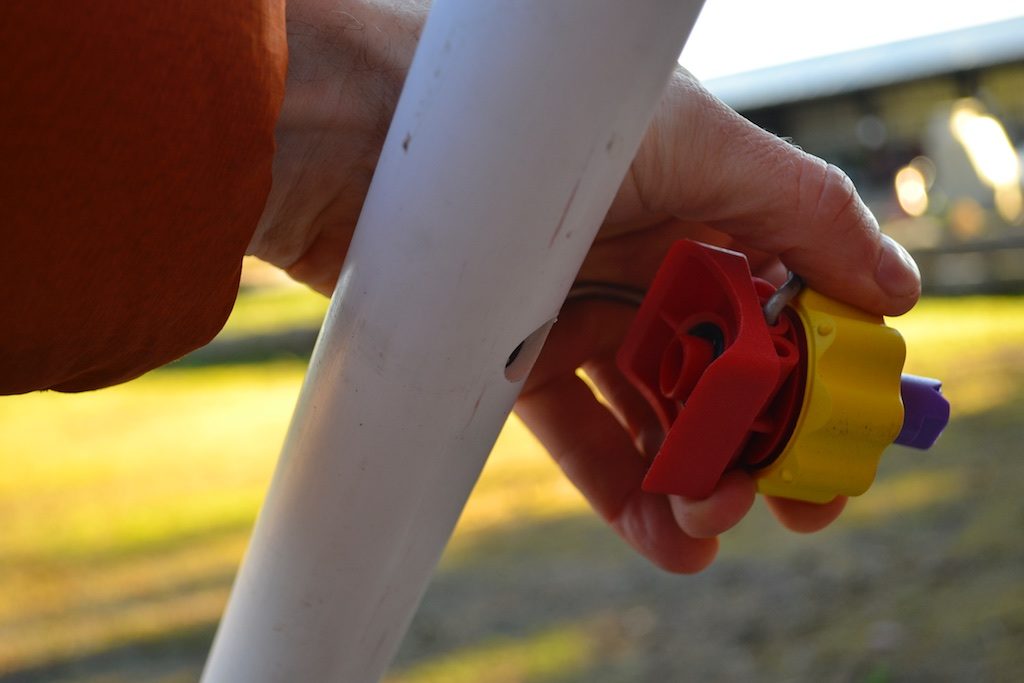
I added a simple spray nozzle to the optional faucet to make a hands-free spray option. This version of the nozzle has a quick partial shut-off to save water, but it would be better if it fully shut off.
For years I used mesh tables that just dumped spray water and mud at my feet and left me standing in a mud puddle. For the past 5 years I’ve been using tables that direct the water away from my feet. This table collects the water and pipes it away from the user. Because the table is mobile the pipe is not connected to a drain, but it can be positioned over a floor drain or a settling tub to help capture soil and debris before it goes down the drain.
This table is set up with the drain simply dumping water to the side. In this packing shed there is a floor drain that will catch that water, but a hose could be attached to the drain pipe to move the water away from the work area.
One additional feature I find useful is a back splash. This prevents product (and water) from falling off the back of the table. I design tables for single users so they are one sided. I’ve found it difficult for more than one person to use a table at a time collaboratively so I design tables to work well for one user at a time and encourage farms to have more than one table if they need multiple users.
Because a sink is used in this design this table has the additional feature of a basin that can be filled with water for pre-soaking vegetables. I included two options of grates that can cover the sink basin so that the sink can be used solely as a spray table, in which case the basin of the sink just functions to catch the water and mud coming off of the vegetables and to funnel them into the drain pipe which comes out the side, or back of the table.
This stainless and silicone roll up drain rack sits over the sink and will keep product from falling into the sink while still letting water and soil drain away from the work surface.
The drain rack rolls up for storage, to only partially cover the sink or to access the sink drain.
Construction Details
In researching the least expensive way to get a functional stainless surface that was appropriate I settled on using a single basin sink, double drain board restaurant sink. Because these sinks are mass produced they are relatively inexpensive and the dimensions are similar to the tables I’ve built in the past. The price of the sink isn’t much more than the actual price of the stainless steel so it’s definitely much cheaper than custom building a stainless table. There is also good availability of used restaurant sinks, although finding exactly the size you want might not always be possible.
For the sprayer I purchased a matching restaurant faucet and pre-rinse sprayer and attached a spray attachment with a quick on off trickle feature for the faucet. Pre-rinse sprayers are designed to hang above the sink and use a spring to keep them up out of the way, but easily in reach. The spray head for the faucet is a common retrofit for kitchen sinks. The quick on-off trickle feature is to save water, but it would be better if it shut off the water entirely (see photo in the previous section).
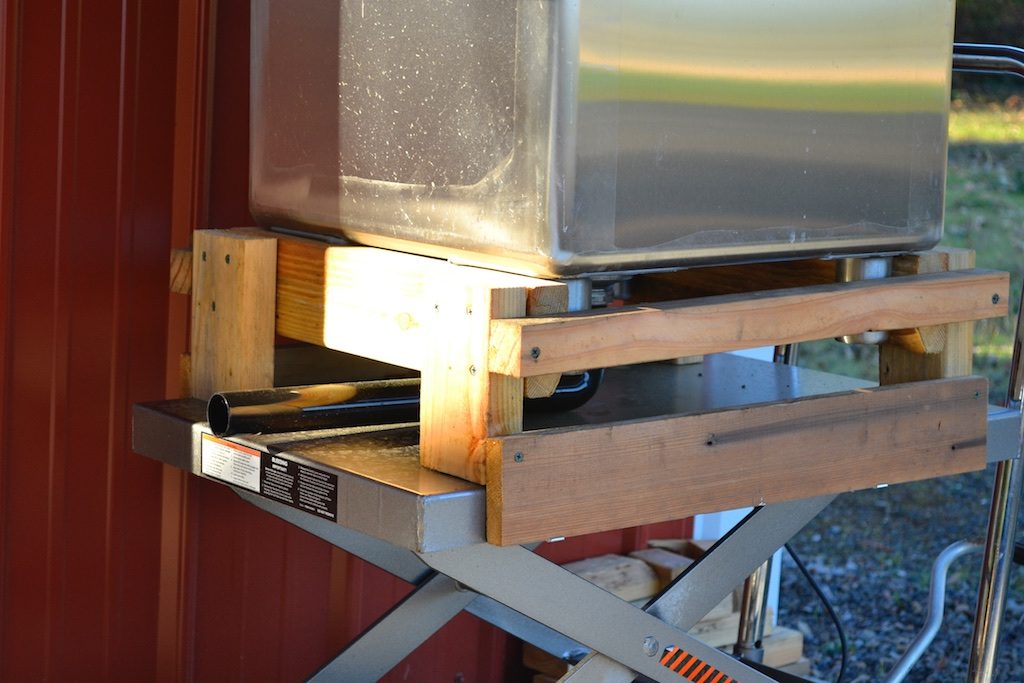
For the base of the sink I replaced the legs with a rolling adjustable height work cart. Like sinks, these are common enough that there are inexpensive versions available online. They are commonly used by mechanics for lifting heavy parts to a good working height, like engine blocks. The lift mechanism is operated with a simple foot pedal and it is lowered with a hand lever. Operation is quick and easy, and it will adjust to any height within a range.
The cart will adjust quickly to any height within a range, but the upper end is definitely higher than you would need.
And the lowest setting is probably lower than most people would ever need.
I attached the sink to the cart with a wooden frame. That frame leaves just enough space for a drain pipe to extend out from the side, and the pipe could easily be extended to the rear, or redirected by attaching a drainage hose.
Water is supplied to the table by screwing in standard ¾” garden hose to the cold side. The hot water valve needs to be left closed, but can be opened to drain water from the system to keep it from freezing and breaking the faucet in cold weather.
A hose adapter is screwed into the back of the cold side of the sink and the hot side is left blank to help drain the system when freezing weather is possible. This photo also shows the foot pedal on the lower left that raises the table. The black hand lever on the cart handle lowers the table.
Part
Description
Source
Price
Sink
Regency 54” 16 gauge stainless steel one compartment commercial sink with 2 drainboards – 18x18x14” bowl
webstaurantstore.com
$345 + $146 shipping
Pre-rinse Sprayer with Faucet
1.42 GPM wall mounted pre-rinse assembly with 8” centers and 12” add on faucet
webstaurantstore.com
$170
Faucet Adapter
Necessary parts for mounting the faucet to the sink
webstaurantstore.com
$15
Sink drain rack
Over the sink multipurpose stainless steel roll-up dish pot drying rack, 20.3”
Amazon.com
$29
Sink drain kit
Drain tail piece plus 90 degree angled waste pipe.
Four 1×1/2” corner brackets to hold the frame down
Hardware store
$3
Screws
Assortment of 1 ½ “ to 2 ½” deck screws to hold it all together
Hardware store
$5
Pipe to hose adapter
½” FPT to ¾” FHT adapter
Hardware store
$6.50
Approximate parts TOTAL
$931.50
Assembly Instructions and Required Tools
Assembly of the sink and its plumbing is fairly straight forward. The faucet, pre-rinse sprayer assembly and faucet adapter all screw together using generous wraps of Teflon tape on the threads. Make sure to slide the hook onto the riser pipe for hanging the pre-rinse sprayer when the sprayer is not in use. The hose thread to pipe thread adapter gets screwed onto one of the faucet inlets on the back side of the sink using Teflon tape. I hooked it up to the “cold” side, but it doesn’t matter which you use. For screwing these parts together I mostly tightened by hand, but it was helpful to have a pipe wrench and a pair of channel lock pliers to snug everything down. The faucet surfaces are chromed so use a thick rag, copper jaws or something similar to protect the finish.
The aerator on the faucet is unscrewed and replaced with the spray nozzle (without Teflon tape – there is a washer that creates the seal). The pliers make this job easy. The threads only need to be snugged against the washer.
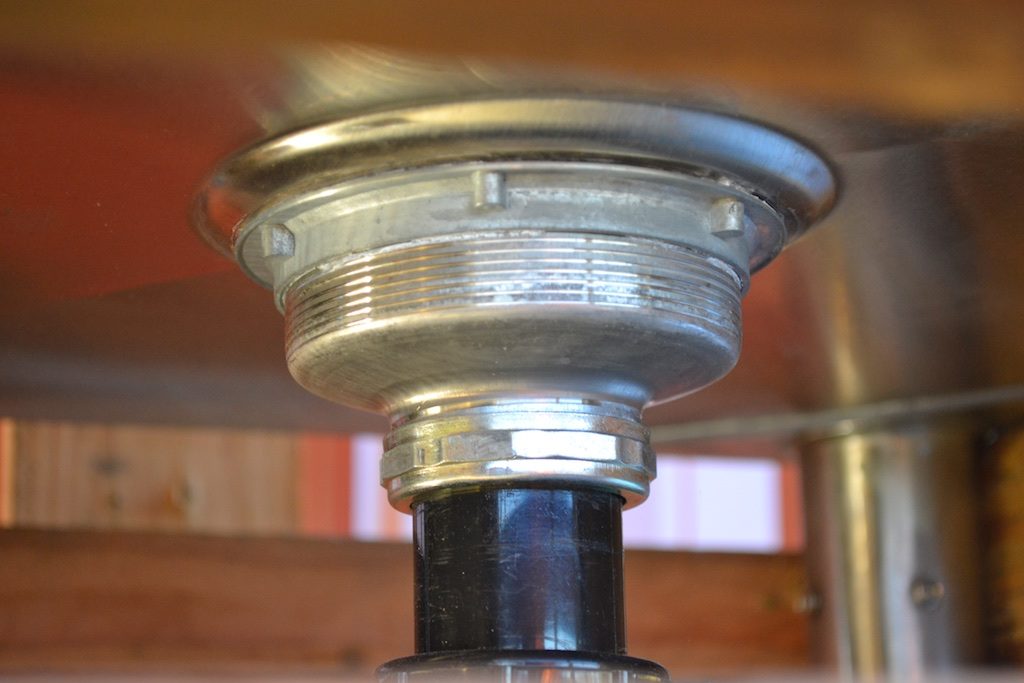
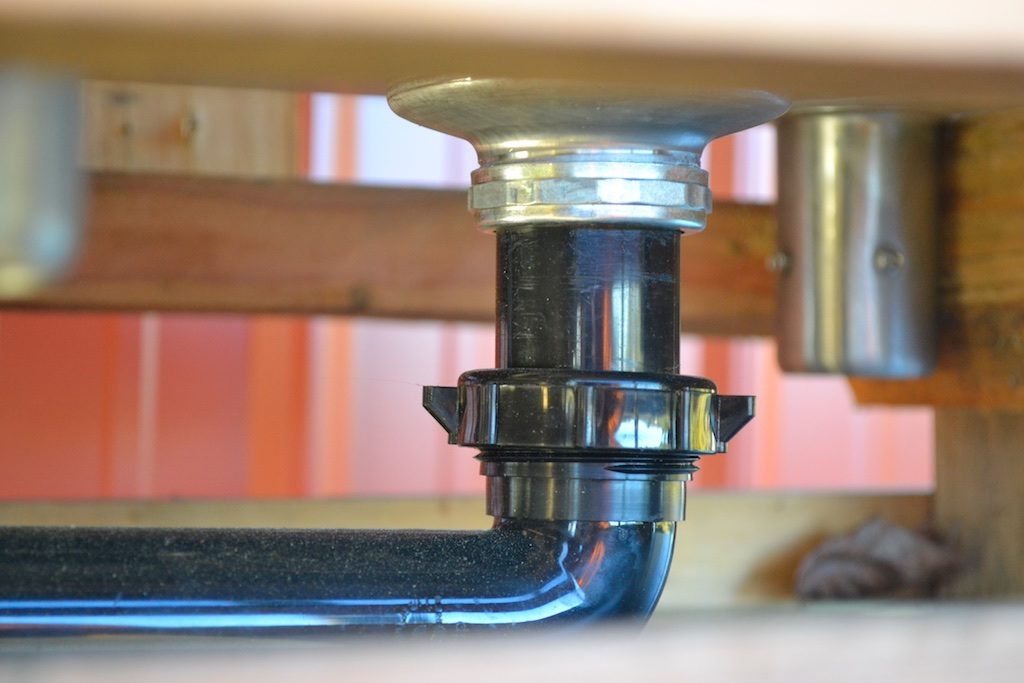
For the drain, screw in the drain cup using the rubber washer on the bottom side to make a seal with the sink bowl. Trim the tail piece so that there is just enough room to fit the waste pipe to it. Pretty much any hand saw can be used for trimming the plastic plumbing pieces.
The drain cup is held in place with a threaded ring under the sink.
I trimmed a standard tail piece short and attached a drain pipe long enough to send the water off the side of the cart.
To create a platform for the sink to sit on I used some scrap lumber. I’ve put suggested sizes in the parts list but you’ll need to measure your particular sink and cart to make sure the measurements work for your parts. I used a basic skill saw and drill driver to assemble these parts (see the photos above for good views of the platform).
I sized my platform so that it fit around the leg brackets snuggly on the outside. The sink is not actually attached to this wooden platform, other than a friction fit and gravity holding it in place. Using screws at the outsides corners, and predrilling holes for the screws to prevent splitting the wood, provides enough bracing to keep it all from wobbling since the legs are very short. The 1x plates on the front and back keep the platform from sliding off and I used the metal angle brackets to keep the wooden platform from lifting off of the cart.
A simple angle bracket is screwed to the bottom of the wood frame and hooks the metal lift platform to keep it from lifting off unintentionally.
I attached a long scrap of 1×4 to the back of the wooden platform that extended up above the sink in the back. A second short scrap of 1×4 with one end cut at a 45 degree angle to shed water is screwed to the long 1×4 and clamps it to the top edge of the stainless steel backsplash. Near the top of the 1×4 I drilled a hole with a spade bit to allow the support for the pre-rinse sprayer riser pipe to slide through. I screwed the bracket for the support to the 1×4 and fixed the support in place.
The wooden support for the sprayer plumbing extends behind the table all the way down to the wooden frame at the bottom of the sink. A simple second piece of wood clamps it to the lip of the back splash.
Potential Future Improvements
Incorporated shelves for the ends could be built as separate low stands next to the table, or in a future design update it might be good to use two lift carts tied together on either end of the table that would function as the low shelves. The hydraulics on the two carts could be coupled so that they lift simultaneously, allowing the shelves to maintain their relationship to the table top. This would also help to stabilize the entire work surface as it would move the cart wheels out to the edges.
It would be better if the casters on the cart had higher quality locking mechanisms. The ones that came with this very inexpensive cart are difficult to lock and are only single locking, meaning they still allow slight wobbling when locked.
The one feature of the sink itself that I don’t like is that the sides have a rolled edge that sticks up. This works well for a drain board that is designed to keep water going to the sink but in this application it would be nice if it were flush with the drain board to allow product to be slid off the end and into a clean bin sitting next to the table. This is a modification that could be made by a sheet metal worker. It would likely require cutting off the existing rolled side and then re-welding it beneath the drain board with gussets to maintain the structural integrity.
One of the biggest problems I see immediately with this design is that the limited diameter of the plumbing on the standard faucet and pre-rinse sprayer reduces the flow. This potentially saves water, but it also increases the time to wash very muddy roots or to fill the sink basin. There’s no easy way around this, other than building custom plumbing to replace these parts. On my own wash table I use a length of 3/4″ garden hose with a garden sprayer hanging over the table and an adjustable shower arm with a high pressure head (from a bathroom shower) instead of the more standard sink parts. This looks a bit funky, and takes some fiddling with parts to make it fit, but it does allow more water to flow when needed.
This is my wash table with a hanging garden hose, and adjustable shower arm. You can see that the surface is made from wood lath and that there are shelves on the ends that allow bins to sit relatively flush. All of these features could be incorporated into the design that uses a stainless sink instead of the wooden lath.
The current design in general is not super stable, due partly to the relatively narrow stance of the wheels on the cart in relation to the overall width of the sink. A second potential stability problem is that the sink is not actually positively attached to the wooden stand, and relies on a tight fit with the wooden stand and gravity to keep it in place. In most situations this should be fine but if the cart tips over due to uneven loading on the edges, or leaning too much against it the sink might separate from the stand and break the waste pipe. The single locking casters on the cart also don’t help the stability.
There are a number of ways the stability could be improved. As mentioned above adding a second cart would move the wheels out to the edges which would be a big improvement. The existing wheels could also be removed from the cart, or carts and replaced with an extra frame of either metal or wood that would extend the footprint. Higher quality double locking casters could keep the mobility high. Simply using fixed wheels on one end and feet on the other would improve stability with less expense, and would require that the cart be tipped up on the wheeled end to move, which would probably not be too difficult, especially for occasional moving.
On this version of the table the standard handle that comes with the lift cart is long enough that it prevents the table from fully descending. The handle is easily partially removed to allow the cart to be as short as possible, but without extra effort it cannot be completely removed as it incorporates the release lever that lowers the work platform. The handle could also be easily shortened by chopping it off a few inches and drilling new holes for the attaching pins.
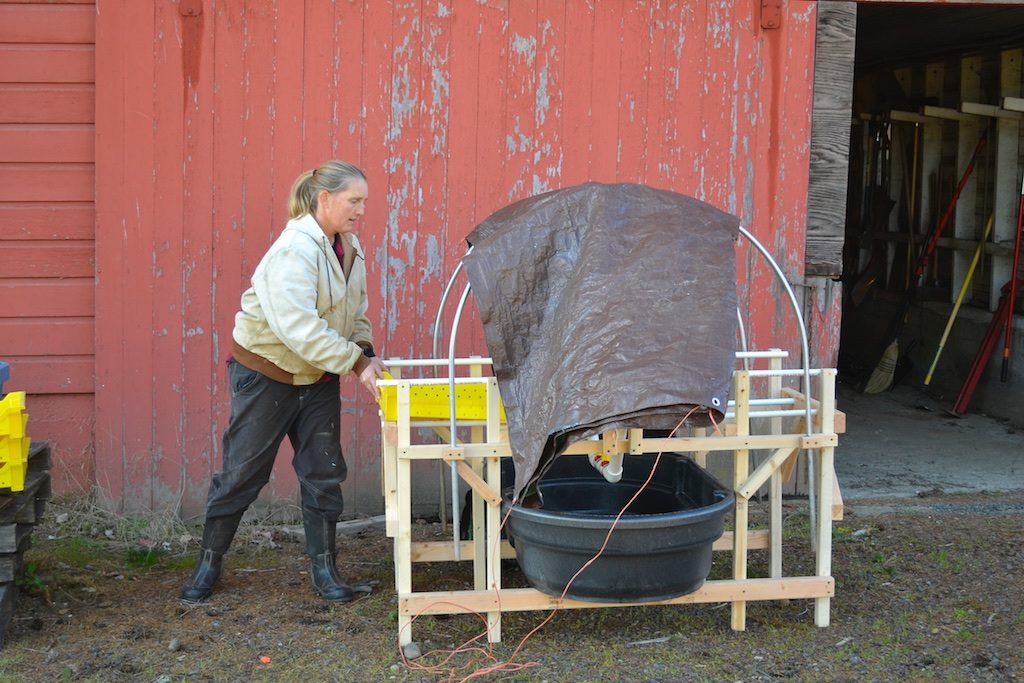
Heidi demonstrating how a bin can be slid through the washer. The tarp for keeping water from flying everywhere is removed to show the spray manifold.
Background
In 2017 I worked with Nick Andrews and Heidi Noordijk at the North Willamette Research and Extension Center (NWREC) to help them develop a small wash and pack area to go with their Organic vegetable learning farm. The work was funded by a Clackamas Extension Innovation Grant. Part of the project was to design a few essential pieces of “furniture.”
The intention for the packing shed goes beyond just creating a functional space for packing vegetables out of the trial field, it’s also meant to be a testing ground for equipment, and a demonstration and teaching space for new and continuing farmers.
Basic Design
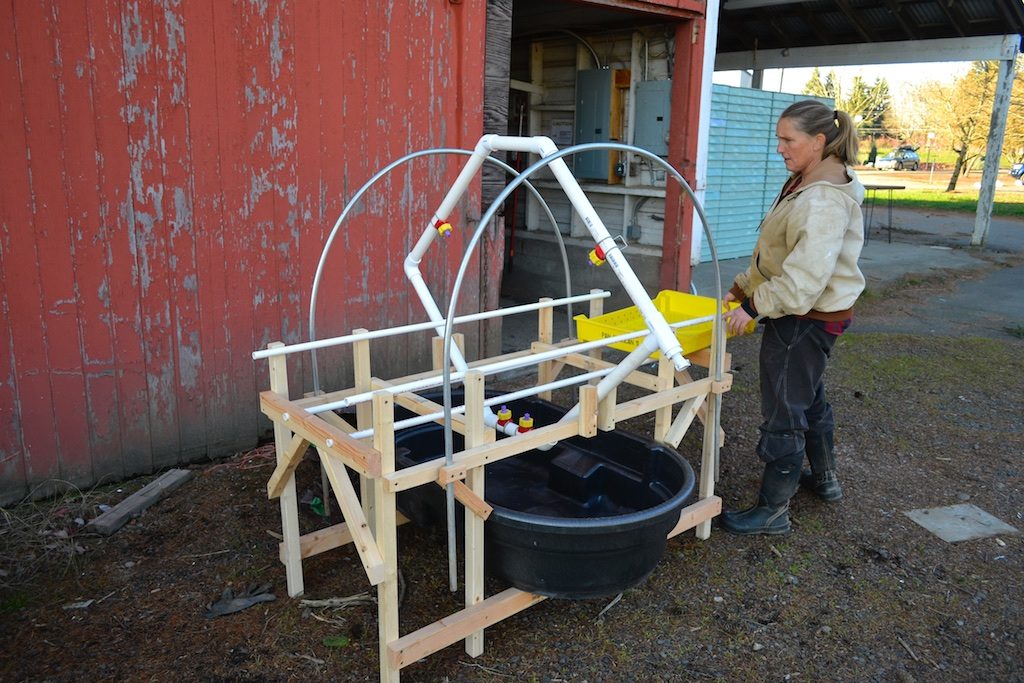
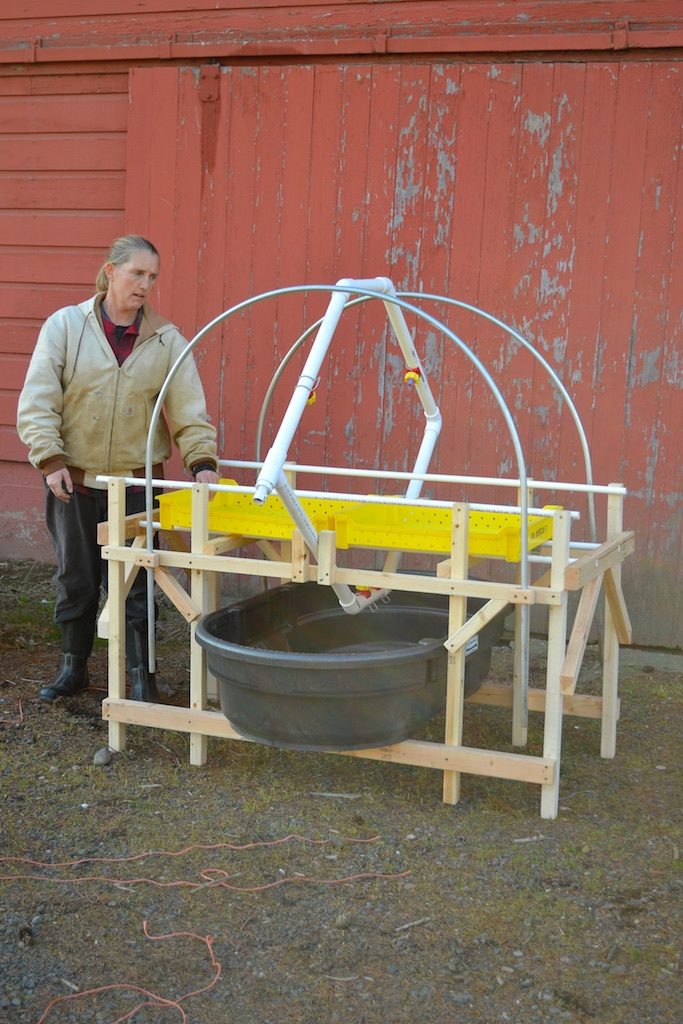
The initial request for this piece of furniture was to develop a way to wash totes quickly and easily. The preference was for a feed through design and site limitations required a design with water flow limited to 12 gpm, and no power.
There are several commercial options available that fit the criteria of feed through, but they all have power requirements to run conveyor chains and pumps. Roeters Farm Equipment in Michigan sells two different chain conveyor washers for $4100-6000 that are designed for washing vegetables but are also being used by growers for washing totes. HarvestLugs.com sells a dedicated lug washer for about $18,500. They estimate it takes 2 people to operate the machine and it can wash 60-70 lugs a minute.
The prototype design for this simpler tote washer also requires two people to operate efficiently, with one loading the dirty totes and one emptying at the far end. There are PVC pipe rails that the totes slide on, upside down, and they pass through a tunnel where four spray nozzles are directed to spray all of the surfaces of the lugs before coming out the other end.
Below the rails and spray nozzles is a stock tank to catch and redirect the water and dirt coming off of the lugs. Water is fed into the system by a standard ¾” hose.
On a side note, this design could be used to pre-rinse vegetables in totes by running totes with good drainage full of vegetables through it.
The basic design has PVC rails for the totes to slide on. The totes are intended to be slid through upside down (unlike what is happening in the photo). A hose feeds the spray manifold and the four sprayers are arranged so that the two top sprayers hit the sides and bottom of the bins, and the two lower spray nozzles hit the inside walls and floor of the bins, spraying off every surface. Because the manifold is so large it takes a good bit of time and water to fill before it starts spraying. The four spray nozzles use about 8 gallons per minute and don’t provide enough impact to scrub very dirty bins in a single pass. The stock tank below captures the dirty water and a drain drilled in the bottom allows the water to be redirected away from the work area. A tarp (not shown in this photo) keeps the water contained. In use I did find it quick and easy to scrub the totes with a brush while they were sitting on the rails to loosen debris, after an initial pass to get them wet, and before a second pass to rinse them off.
The following short video shows the first trial of the tote washer.
Construction Details
The basic design is a light weight wooden frame that supports the stock tank, the rails above the tank, the spray nozzle manifold and metal hoops that hold up a tarp to contain the spray.
The frame pieces were cut with a circular saw but any saw could be used. Holes were primarily cut with forstner drill bits and a drill press which make some of the larger holes easier to cut, especially in the PVC which has a tendency to crack with other types of large drill bits, especially when they are fed too fast and the pipe isn’t solidly clamped while drilling.
Part
Description
Source
Price
2×2
Two 8’ lengths for frame
Lumber Yard
$5
2×3
Seven 8’ lengths for frame
Lumber Yard
$15
½” PVC pipe
20’ for sliding rails
Plumbing Supply
$9
1 ¼” PVC pipe
10’ for sprayer manifold
Plumbing supply
$9
1 ¼” PVC 45 fittings
4 for sprayer manifold
Plumbing supply
$5
1 ¼” PVC 90 fittings
1 for sprayer manifold
Plumbing supply
$2
1 ¼” PVC tee fittings
1 for sprayer manifold
Plumbing supply
$2
1 ¼” Slip to ¾” FPT PVC bushing
1 for sprayer manifold
Plumbing supply
$1
¾” FHT to MPT adapter
1 for sprayer manifold
Plumbing supply
$2
K-Ball Nozzles
Purple 0.129 orifice clip on nozzle
US Plastic Corporation
$33
½”EMT conduit
2 10’ lengths
Hardware store
$6
Spring Clamps
6 for attaching tarp to conduit
Hardware store
$3
Tarp
5×7’ tarp
Hardware store
$4
Stock Tank
Rubbermaid 50 gallon stock tank
Farm Supply
$80
Bath waste pipe
basic drain for bath tub
Hardware store
$20
Screws
2 ½” deck screws for framing, 1 ½” for attaching PVC rails
Hardware store
$5
Approximate parts TOTAL
$201
I’m not providing the actual dimensions for the frame as it was built for a couple of reasons but I do think explaining the basic method might be useful so I am detailing that. The main reason I’m not providing the dimensions is that I don’t actually think the prototype is a good size now that it’s actually built. It is a nice, light weight, and feels very solid so the idea was good, but the outside rails are set to wide. (I have more recommendations for changes below in the Potential Future Improvements section.) Here are the basics of how I put the frame together.
Cut all of the frame pieces to size and then screw them together, drilling pilot holes to avoid splitting the wood. I used a circular saw and cordless drill but any saw and drill will work. Quick clamps and a square help with assembly, especially when putting the frame together solo.
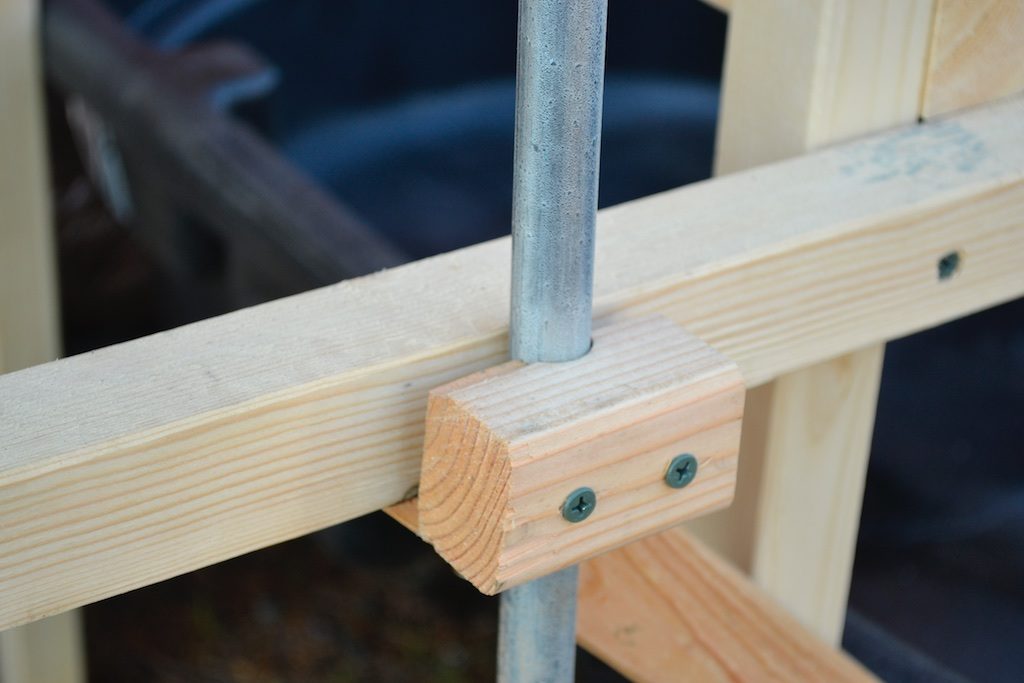
I used a quick hoop bender from Johnny’s to make the two conduit hoops (these were actually just taken from an existing supply on the farm). A separate wooden frame could also be used, or a bender can be made from scrap wood. To clamp the hoops to the frame I drilled holes that approximated the diameter of the conduit into 2×2, then ripped the wood lengthwise and cut off the individual clamps. I also drilled holes for the screws to slide through.
Detail of the wooden blocks made for clamping the EMT quick hoops to the frame.
The manifold is all set up with press fit joints and no glue. These could be glued if they start separating, but leaving them unglued allows the manifold to be easily removed and modified if needed, or even cleaned on the insides. I drilled the holes in the manifold for the clip on nozzles using a forstner drill bit and a drill press, and going slowly. PVC is prone to cracking when drilling holes so it helps to go slowly and steady with a drill press but it is possible to drill the holes manually with some care.
K-Ball spray nozzles quickly clamp to PVC pipe and can be rotated to fine tune the direction of spray. I like the basic design, but I feel like a lower flow and smaller pipe size would be helpful for this application.
Detail of the hole drilled in the PVC and the back side of the K-Ball nozzles. An O-ring makes the seal.
The tarp is just clamped to the hoops which makes it easy to remove.
I’ve used a simple tarp to keep the water from spraying everywhere. This is clamped to the EMT hoops with simple spring clamps (not shown). This is an inexpensive and very functional way of containing the water, but it might not be as appropriate, or might require more clamps in windy areas.
Holes for the drain in the tub are drilled using hole saws and the tub simply sits in the frame. A standard bathtub drain kit can be installed in the bottom of the stock tank to provide drainage and direct the water away from the work area.
Potential Future Improvements
My hope was that this washer would be strong enough to clean the majority of dirt and debris off of used harvest lugs. The reality is that it will rinse them off well, but multiple passes and manual brushing is still required for totes with any significant soil and debris attached.
In limited testing it is still marginally faster than manually washing lugs, and much more ergonomic. It also contains the water well, allowing the wash water to be diverted away from the work area. The rails actually provide a good support for scrubbing out lugs, but the continuous water flow wastes water while lugs aren’t passing through.
A knee or foot valve would be an easy way to save water, but it would add significant expense, most likely in the neighborhood of $100 or more and it might reduce the water flow. A larger chain operated valve might allow more flow but would require creating a separate lever mechanism and would be more expensive.
This basic design could be easily modified to work with a single user. I think adding a foot, or knee operated valve, using a single fixed spray head directed down and slightly away from the user and into the tub would be a good set up. Using the sliding rails simply as a table to place the bin on while scrubbing and then manually moving the lug under the spray as the water is on would keep the water relatively contained, and allow access to all edges of the lug.
With the current configuration one design improvement might be making most of the manifold from smaller diameter pipe and reducing the amount of pipe above the bottom nozzles. The shut off valve should also be moved closer to end where one of the users can easily turn it on and off. This would reduce the amount of water and time that it takes to fill the manifold, not insignificant with the current design. It would also reduce the amount of water than drains from the nozzles between uses. Changing the nozzle types might also help. All of these changes would add materials costs.
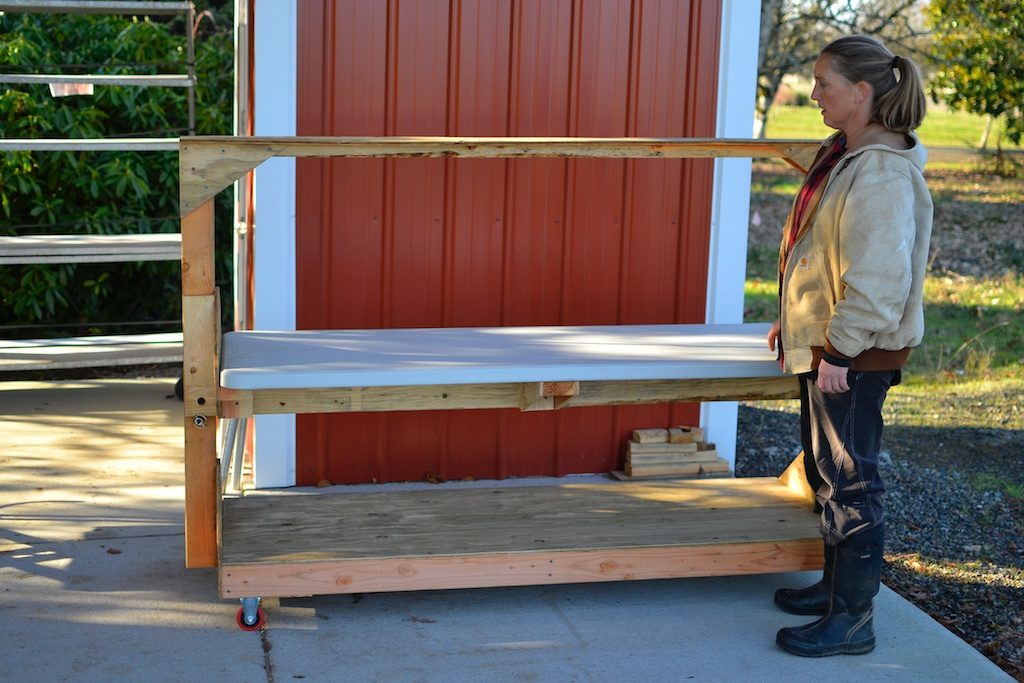
Rolling packing table with under and over shelves and adjustable working height
Background
In 2017 I worked with Nick Andrews and Heidi Noordijk at the North Willamette Research and Extension Center (NWREC) to help them develop a small wash and pack area to go with their Organic vegetable learning farm. The work was funded by a Clackamas Extension Innovation Grant. Part of the project was to design a few essential pieces of “furniture.”
The intention for the packing shed goes beyond just creating a functional space for packing vegetables out of the trial field, it’s also meant to be a testing ground for equipment, and a demonstration and teaching space for new and continuing farmers.
Basic Design
With that audience in mind I designed the table based on feedback from Nick and Heidi and with my personal experience packing vegetables on small farms with diverse crops. Here are the basic design features of the table.
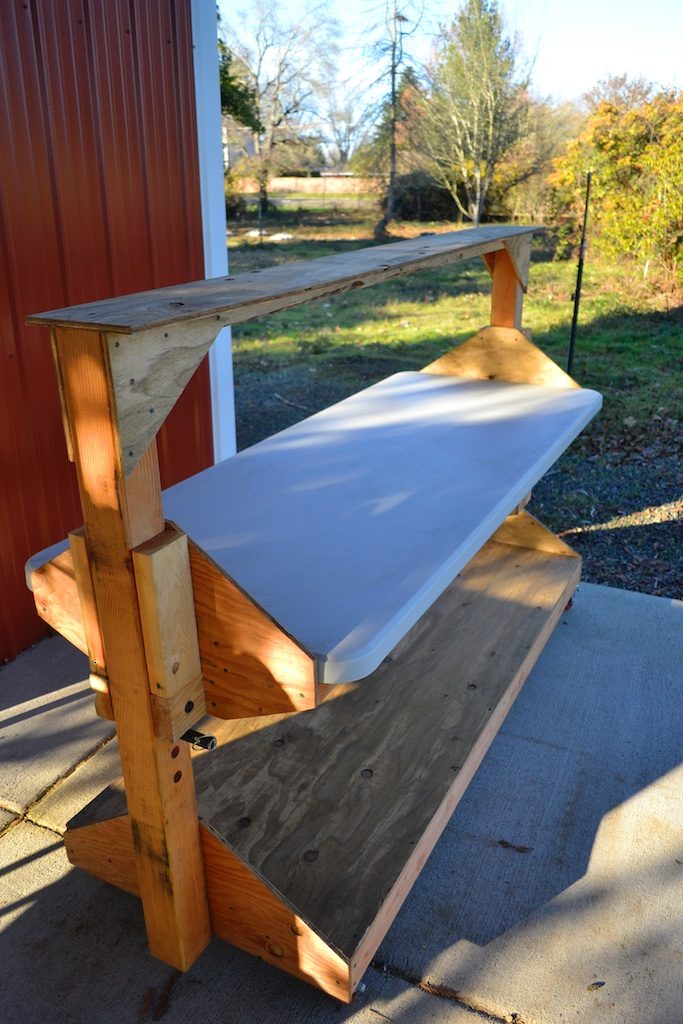
The first and most basic feature is a large, smooth, non-porous work surface. The table uses a 6′ plastic table top, but could also be fitted with a stainless work surface (or wood). The intention was to have a tough work surface that is easily cleaned to make the table acceptable for GAP standards and FSMA rules. The frame of the rest of the table is wood which is relatively inexpensive, durable and easy to work with. The same design could easily be built from steel or aluminum which would increase the cost but might make it easier to clean.
The table has a large shelf below the table top which is suitable for holding packing supplies like wax boxes or produce waiting to be packed.
There is a smaller, high shelf which is suitable for holding labels, marking pens, tape and other tools. This is a good place to clamp work lights to help illuminate the work surface to reduce eye strain if additional light is needed.
The table is on wheels making it easy to roll on a hard smooth surface. The packing table can be moved as needed allowing flexibility with the pack shed work flow. The rolling table can also be used to move packing materials from one place to another, rolled out of the way when not in use, or when the floor needs to be cleaned.
Different packing operations and different farm workers often benefit from different work heights. The table top height is adjustable with two pins on the ends. The pins can be set in holes at different heights to support the table at lower or higher heights.
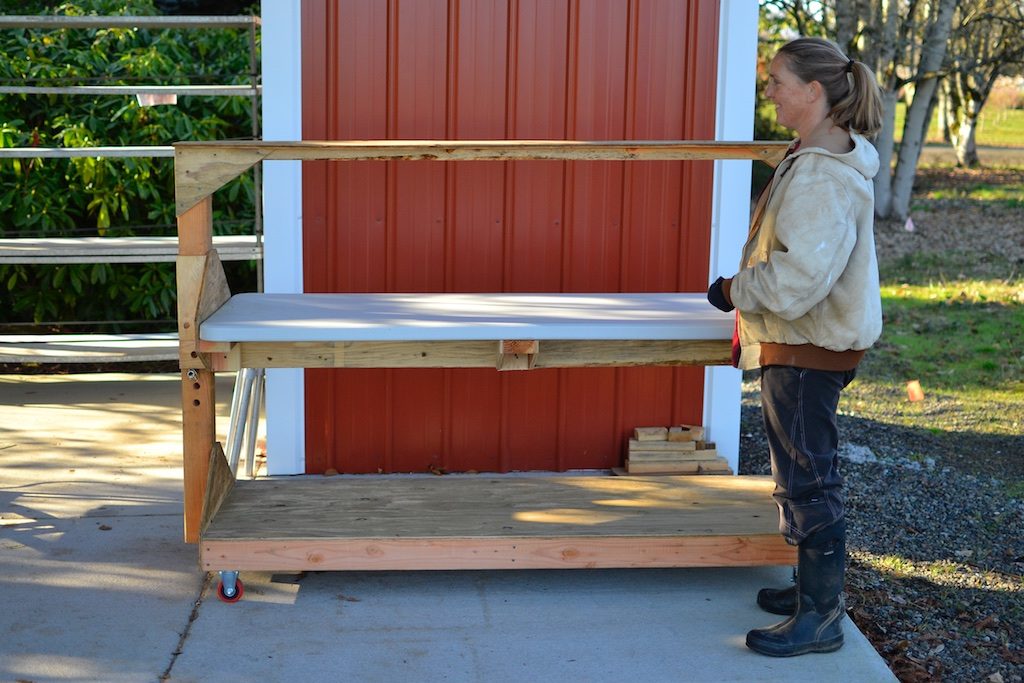
Heidi with the table surface set low.
Heidi looking happier with the work surface set higher
The final consideration was cost and accessibility. I wanted to keep the cost as low as possible, while still offering good functionality, and I also wanted to make sure it was possible to build with some basic tools and skills. The materials costs for the project (detailed below) were about $240 for me. It took me a while to work out the design, but the actual construction only took a long day (hard to say exactly how long actually as I was still working out some design details in there). With the sliding table feature it pays to take your time and be a little fiddly with getting everything just so.
Construction Basics
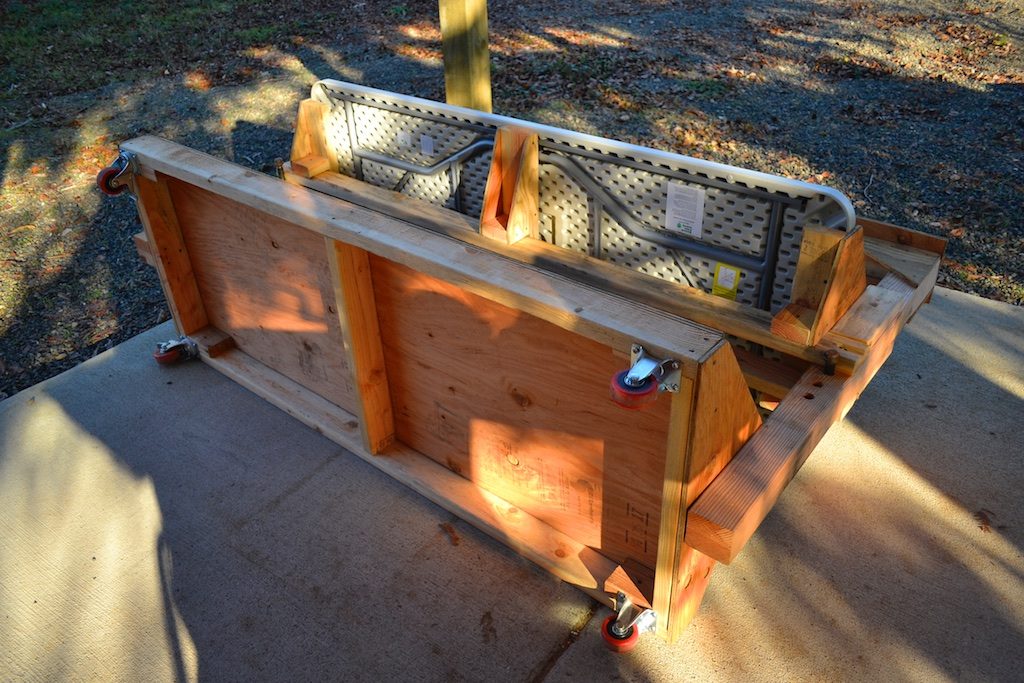
Construction of the table starts with building a simple plywood and 2×4 platform for the bottom shelf. This is set up on the casters, using blocks on the corners to add extra surface to screw the caster plates to.
Photo showing the underside of the table and lower shelf. You can see the added blocks for mounting the casters in the corners.
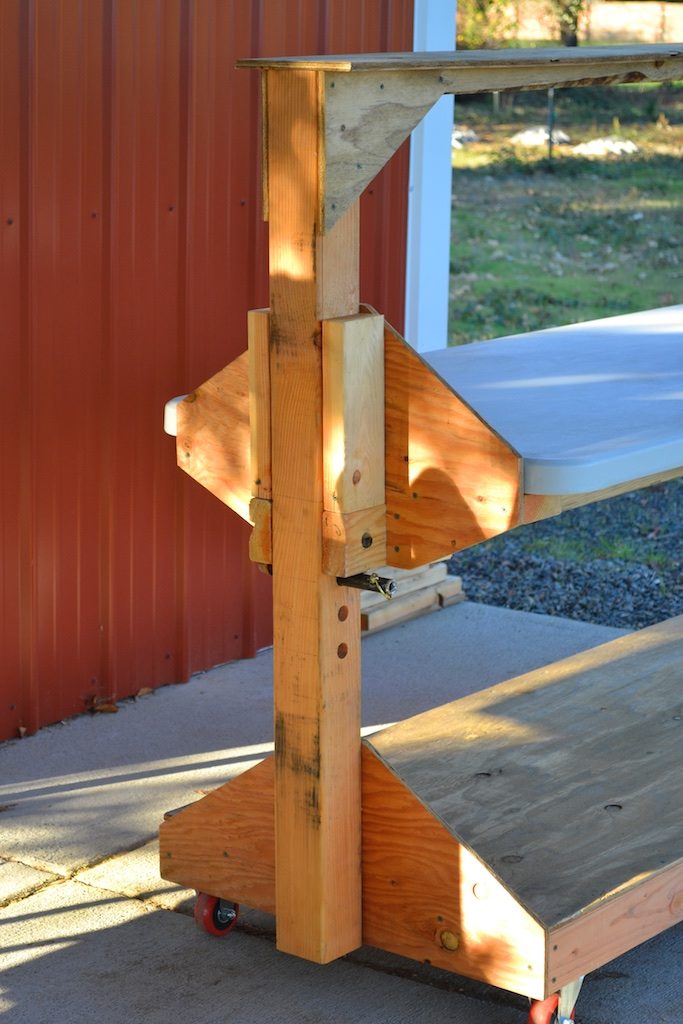
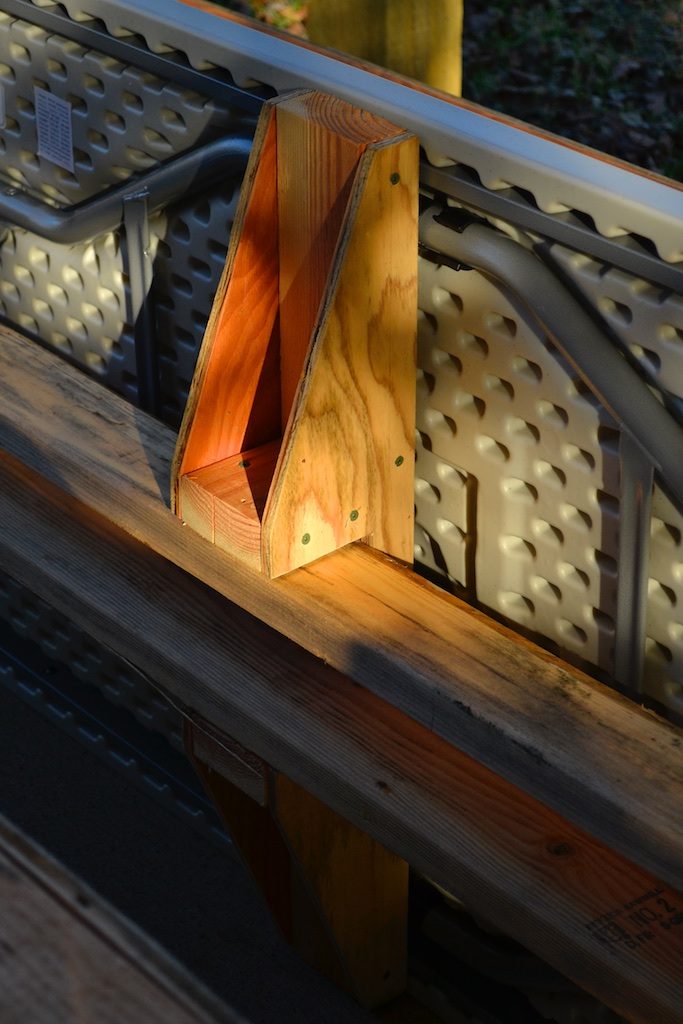
Two 4×4 uprights are attached to the base platform with plywood gussets and screws to keep them stable on the short axis. At the top of the 4×4 uprights is a 2×4 span that is reinforced with more plywood gussets to provide stability on the long axis of the table. On top of the 2×4 is a narrow plywood shelf.
A framework for the table top is built of 2×4 and plywood gussets. It is designed to slide up and down the 4×4 supports without wobbling. This frame supports the table top on the ends and in the center and it is attached with screws from the bottom so that it will not slide.
This photo shows the end gussets, the pin adjustment system for the table height and the top shelf mounting. The 2x4s that sandwich the 4×4 are only attached to the gusset between the table top and the 4×4. This allows the top to slide up and down, but not to tip or wobble.
Here’s a close up of the back side of that end gusset. You can see one of the 4 screws that holds the table top in place. That block should probably also have two screws in it. It’s actually primarily held in place with screws through the gusset on the far side. Definitely pre-drill holes before screwing into blocks like that, or anywhere near the end of 2x lumber to prevent splitting.
This is a close up of the center support for the table top. The table itself is rated for 1000 pounds, and with these supports it should hold that amount. I try not to overbuild as it adds cost, and also weight, and can be counterproductive. Extra weight makes things harder to move around both when building them, and later. I also try not to under-build but to build smart. It’s a fine line and there’s a bit of personal preference there.
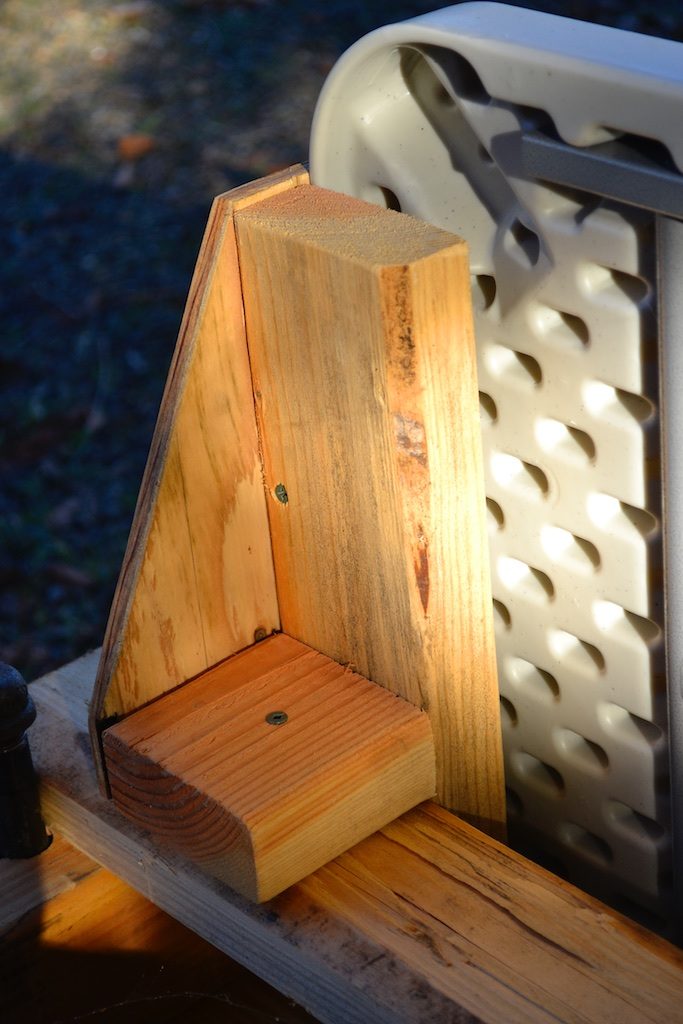
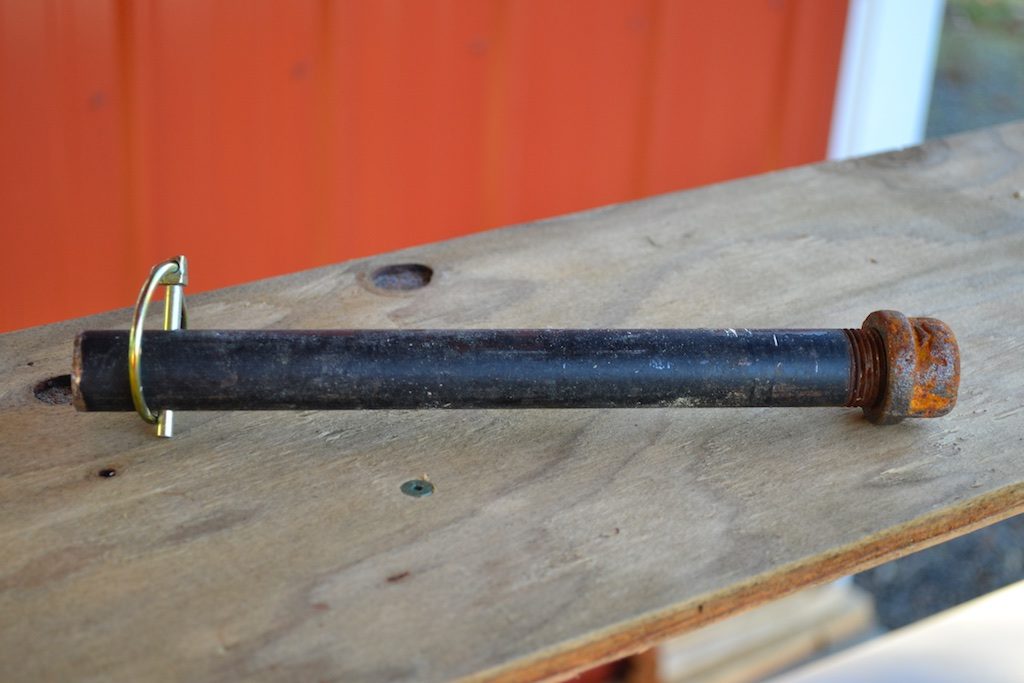
Heavy pins are made from ½” black pipe which insert into holes in the 4×4 uprights. The pins allow the table height to adjust by sliding the table top up or down on the uprights and then placing the pin in the closest holes below the desired height. The lynch pins and pipe caps keep the pin from coming out unintentionally.
The pin made from a black pipe nipple, cap, and with a lynch pin to keep it from coming out unintentionally
The table surface that is used for the packing surface is a standard 6’ plastic folding table from National Seating. You can clearly see the underside of this table in one of the photos above. It is attached with four screws, so that it won’t slide out of place, but it can be easily removed and replaced, or used as a standard folding table.
Construction Details
I’m including a drawing of the table below with a few dimensions, the parts list and costs from the prototype, a rough cut list and more detailed step by step method for building the table. At the very end of this writeup there is a discussion of a few potential improvements or modifications I can see already.
I’m not giving a lot of dimensions, and you should double check the ones I do give. As I outline in the detailed step by step method, a lot of the dimensions should be checked against the actual dimensions of the table top you use.
The end view of the table on the left should probably say 48″, but my 8′ 4×4 was an inch long, which is not uncommon. You could also use a 10′ 4×4 if you can find a straight one and make the top shelf a bit higher (maybe not as good if you’re working with shorter people on your crew). The end view on the right is actually a center cross section. The sketch on the bottom is a suggested cut layout for getting all of the plywood pieces from a single 4×8′ sheet. The gusset dimensions are a bit flexible and the length of the lower shelf and upper shelf are both determined more exactly by the table top you use. Widths for those are also optional, but they worked well for me. Drill the holes to set the table top at whatever working heights you want.
Part
Description
Source
Price
Screws
1 ½” and 2 ½” deck screws for frame
1/4×2” lag bolts with washers for attaching casters
Hardware Store
$10
4×4
8’
Lumber Yard
$8
2×4
60’
Lumber Yard
$29
Plywood
One sheet ½” CDX
Lumber Yard
$22
Folding Table
National Public Seating 30×72” 1000lb capacity folding table
Amazon
$89
Double locking Casters
Two 3” non-marking double locking casters
Peachtree Woodworking Supply
$37.00
Fixed wheels
Two 3” non-marking
Peachtree Woodworking Supply
$25.00
Black pipe nipple
One 1/2×18” nipple
Hardware Store
$10
Pipe cap
Two ½” caps
Hardware Store
$3
lynch pin
Two 3/16 lynch pins
Hardware Store
$4
Approximate parts TOTAL
$237
Approximate Cut List:
4×4
(2) 48” uprights
2×4
(2) 71.5” base shelf runners (these should actually be a hair over the length of the table top used)
(3) 25” base shelf cross supports
(1) 72.5” top bar (this should actually be the same length as the bottom shelf plus two gussets)
(2) 79.5” table top supports
(4) 8.5” upright side supports
(2) 24.5” table top end cross supports (this is actually just under the width of the table at the very ends – mine had rounded corners so I only measured the straight part)
(1) 29.5” table top middle cross support (this is actually just under the width of the table)
(10) 3.5” blocks
½” Plywood (dimensions match 2×4 pieces they support and can vary slightly)
(1) Top shelf
(1) Base shelf
(2) Base shelf end gussets
(2) Table top end gussets
(2) Table center support gussets
(4) Top rail gussets
Assembly Instructions and Required Tools
Start by laying out all of the cuts for the plywood gussets and shelf pieces (DRAWING). These will all fit onto a single sheet of plywood, but only if you’re smart about how you make the cuts. A long (4’) straight edge and a string line makes this easier. I also used a framing square, measuring tape and pencil. For the long straight cuts I like to screw or clamp a straight board to the plywood to use as a cutting guide to get the edge very straight and smooth. With all wood cuts I also like to quickly soften the edges and remove any splintering with coarse, 80 grit, sandpaper wrapped around a wood block after making the cuts. To make the cuts I use a circular saw, but any type of saw that will cut straight will work.
Cut all of the 2×4 pieces for the base. If anything, you want the ends of the 2×4 base pieces to be just slightly proud of the plywood on the short edges. This will make the 4×4 and gusset attachment easier to get tight against the 2x4s. The platform needs to be just a hair longer than the table top that you’ll be using, and could be as much as 1/16-1/8” longer without causing any trouble. If it’s shorter the sliding mechanism won’t work.
Screw the bottom frame pieces together. I only use 2 screws per connection and I pre-drill to prevent splitting. When I screw on the plywood I make sure the frame is square at the corners and then add screws every 12-16” around the edges and through the cross supports in the middle of the platform.
Screw the gussets to the ends of the bottom platform. I use two screws at the outside corners, and four more screws along the length, avoiding the area where the 4×4 uprights will go.
I attached the wheels at this point, which worked well for me. I was working in a very cramped space and it was convenient to be able to roll the table around as I was working on it. The wheels could also be attached at any point after this in the process.
To attach the wheels I added scrap 2×4 blocks to the inside corners of the platform (see photo above). I then used one set to mark the hole locations for the screws and drilled pilot holes. The two locking casters are screwed onto one end with the ¼” lag bolts, and the fixed wheels go on the far ends.
Cut the 4×4 into two equal length pieces. The actual length is less important than that they are equal in length, and that the cuts are square (especially on the top side). Make sure to select a 4×4 that is straight and has no twist. This is important because the table slides on the 4×4 and it will bind if it is not straight and true.
You can drill the holes for the ½” black pipe pin now, or wait until the table top is installed and check the working heights you want to use. I used a 7/8” spade bit to drill the holes. If you have a drill press that will make a 3.5” deep hole this would be a good place to use it to keep the holes square. I just used a cordless drill. With spade bits it’s best to drill until the point is just protruding from the far end and then to drill into the far end using the small hole to center the bit. This prevents major tear-out that happens when the bit comes out the far side but keeps the bit aligned so the two holes from opposite sides line up properly.
Cut the 2×4 top rail to match the length of the assembled bottom frame with the two plywood gussets, or just a hair under. If the top rail is too long it will be impossible to make the uprights square.
Attach the 4×4 uprights to the end gussets keeping them centered and using a square to make sure they are square to the base platform. I find that getting close with Irwin Quick Clamps, setting one screw, then readjusting and clamping before setting a second screw helps with many of these joints, especially if you’re building the table solo. The first two screws should go into the gusset above the platform, one close to the top of the gusset and the other low, close to the platform. Wait to put the rest of the screws in until the joints at the top of the 4×4’s are secured.
Again, using only two screws per joint, attach the top rail to the 4×4 uprights with the gussets. Check the square and use clamps to help adjust and hold the work as you go. Once all of the gussets are tacked into place and the 4x4s are square to the frame start adding extra screws to stiffen the frame. For the top gussets I use 4-5 screws per edge. For the gussets at the base I use 4-6 screws above the base and then another 2-4 long screws that go through the 2×4 at the base, through the gusset and into the 4×4.
Attach the top shelf, centering it to the top rail. I use two screws on the ends at the corners of the 4×4 and then zig-zag screws down the length every 10-12”.
Putting together the sliding support frame for the table top requires a bit of fiddling to find a good balance between sliding easily and not wobbling excessively. If you’ve already drilled the holes for the pins in the 4×4 you can make the pins now and use them to help with the next steps.
To make the pins, cut the black pipe nipple in half. This can be done with a hacksaw, or an abrasive wheel. If you have an abrasive grinder use that to soften the edges of the cut. Drill a hole through the pipe about ½” from the cut end of each half. Start with a small bit to drill a pilot hole, maybe 1/8”. Using a center punch to mark the start of the hole will help keep the bit from wandering. When drilling steel, use less rotational speed and more downward pressure than when drilling wood, and definitely use a sharp drill bit that is rated for cutting steel. Once the pilot hole is drilled use a ¼” bit to drill a hole that your lynch pin will fit into. I did this with a cordless drill and the pipe clamped firmly to a table. If you have a drill press this is another good place to use it. Finish the pins by screwing the caps onto the threaded ends.
Insert the pins in the corresponding holes and rest the long rails for the table support on them. If you haven’t drilled the holes yet you can make lines at the same elevation, close to an average table height you think you’ll want to use on both of the 4×4 uprights. Then use a Quick Clamp (or any other kind of clamp or even just nails or screws) clamped to the 4×4 at that level so that the rails have something to sit against. Put a thick piece of paper board, or even better, three thin pieces of paper board (from a cereal box for example) between one of the rails and the 4x4s to shim it out a bit and then clamp the rails to the 4x4s. Make sure the shim material sticks out the on the outside so you can pull it out when you’re finished with it. If you have three pieces the middle piece will be the easy one to pull out and then the other two should come out easily. Don’t let the shim material stick into the area where the gussets will go.
Fit the side gussets over the two 2×4 rails and clamp them to the 4×4 uprights to keep them vertical. Use a piece of paperboard shim behind one of the two gussets to set it off of the 4×4 slightly.
Using two screws and pre-drilled holes attach blocks to the rails, flush against the gussets. Screw another pair of blocks in the center of the rails. Screw the three 2×4 cross supports to both rails, making sure to put the longer one in the center and centering all of them. You only need to put one screw through each rail to support connection to hold these in place.
Next, screw the end gussets to the cross supports and the blocks and add the gussets to the center support. Use at least two screws per block and 3-4 screws per side on the cross supports.
Add the vertical blocks to the end gussets, using the same shim materials to maintain a good spacing. Screw those blocks to the gussets and then put a toe-screw at an angle through the bottom of the block into the end of the rail to keep the block from twisting.
At this point, if you’ve measured everything correctly the folded table should slide onto the cross supports and be snug, or at least close to the end gussets. Center the table on the supports and then drive screws that are just long enough for a few threads to penetrate the plastic through the underside of the cross supports and up into the bottom edge of the table. This will hold the table top from sliding off of the supports. Those screws can be easily removed to allow the table to be used as a regular table, or to replace it when the surface is excessively worn.
If you haven’t drilled the holes in the 4x4s for the pins yet, find your ideal working heights now and make marks. You’ll want to drill the holes far enough below those marks so that the rails rest on the pins when the table is at that height. Make sure the holes are square to the uprights. One clue when using a spade bit is that the when the large spade first contacts the wood surface it makes a full circle all at once. If the bit is tipped it will start scribing an incomplete circle when it first contacts the wood. You can use a speed square to sight against the bit. This is a fairly critical hole and because it’s so long there’s not a lot of room for error here. If you’re unsure of your ability to drill a square hole (meaning square to the surface), use a guide or a drill press.
Potential Future Improvements
Initially my plan was to have the black pipe pins go through both the 4×4 uprights and the 2×4 table top supports in order to positively capture the position. Drilling such a large, long hole accurately turned out to be tricky and so I fell back on just drilling through the 4×4. This means the table top sits on top of the pins but can lift. It’s unlikely this will create problems, but there might be an improvement to be made here for more positive attachment.
A wooden dowel might be less expensive than the black pipe for pins but it would likely not insert as smoothly. A tapered pin might be a good way to hold the table but it would be much more tricky to make.
The balance between sliding easily and wobbling with the table top is a delicate one and it will be interesting to see how the joints hold up long term. Making the table top a fixed height would greatly simplify the construction phase. I will be curious to see how the frame shifts through the year with temperature and humidity changes and as the wood cures. This may end up having a negative (or positive) effect on the adjustable height feature depending on how much the raw wood expands and contracts.
This cart has a lot of potential for customization for special needs, places to hang or hold tools specific to crops grown by different farms, special shelves or outlets for electronics or scales, and dividers below for different box sizes or packing materials.
I don’t usually find it necessary to treat or finish wood surfaces that I use on the farm. As long as it dries out regularly standard construction grade fir does not seem to rot or splinter in my experience. Finishing the surfaces might have some benefit but it also has drawbacks: it takes more time and expense to put on a finish (like oil or paint), the finishing materials are often somewhat toxic, both when applied and when manufactured, and potentially if they scrape off during use. When I do use a finish I prefer raw linseed oil, a finish that is relatively inexpensive, non-toxic, and easy to re-apply when needed.
For wheels I chose to use two fixed wheels and two double-locking casters. Double-locking casters don’t roll and also don’t pivot when locked, but there is still a bit of wiggle with them. Using four double-locking casters would make rolling the cart into position in tight spaces easier but means you’d need to lock four casters instead of two. Even locking one with this design keeps it pretty stable, not the case if you have four. The table, without anything on it, is light enough that two fixed wheels and two leg extensions would probably be enough to make the table moveable and would be less expensive. One end would need to be raised, to roll the table, a bit like a wheel barrow, and it would be stable when it was set back down. This would save money on wheels, and might add some stability, but would make it a bit harder to move, especially if the shelves or table top were loaded with materials.
If you build one of these and/or have suggestions for improvements I’d love to hear about it. Please e-mail me.
Hilling Potatoes is one of the easiest tractor cultivation jobs to start with and it’s incredibly effective.
Lots of small farms I know, including many I’ve worked on, use a small tractor to mow and till, but do all of the planting and cultivation by hand. This is partly because on a really small scale setting up a tractor cultivator almost doesn’t make sense, and a lot of times it’s also because when you’ve never done cultivation with a tractor it can seem intimidating. Figuring out the equipment you need is intimidating, driving over your crops on a big tractor with pieces of steel that will potentially kill them is intimidating, and somewhat rightly so as the inevitable learning mistakes could be catastrophic.
The truth is you don’t need a special cultivating tractor to get started learning how to cultivate with a tractor, and you can set up a simple and effective tool bar for well under $1000, new, that can save much more than that in labor costs within the first year, even on operations that are just a few acres.
Before You Set Up a Tool Bar
There are a number of factors that make cultivating with a tractor -or by hand- much easier. Mechanical cultivation, whether with a hoe or a tractor, is much easier if your beds are relatively trash free: no clumps of un-decomopsed organic matter, old vines, or root stumps still hanging out. A relatively even soil texture, without big clods or rocks, and with a little soil moisture but relatively dry helps. An even, flat bed surface with plants in straight, even rows also makes things far easier. None of these things is particularly difficult, or what I’m going to cover in this post, but definitely keep them in mind.
My recommendation is to not get hung up on wanting to cultivate the space close to your plants when you first start, think about the big open spaces that can take up a lot of the field when plants are young, especially the pathways. The easiest place to cultivate, no matter how experienced you are, is between the rows, and especially in the pathways. This might only be 1/4 to 1/2 of the total area, but still, you’ve just cut your hand hoeing/weeding time and work potentially in half.
A Basic Tool Bar
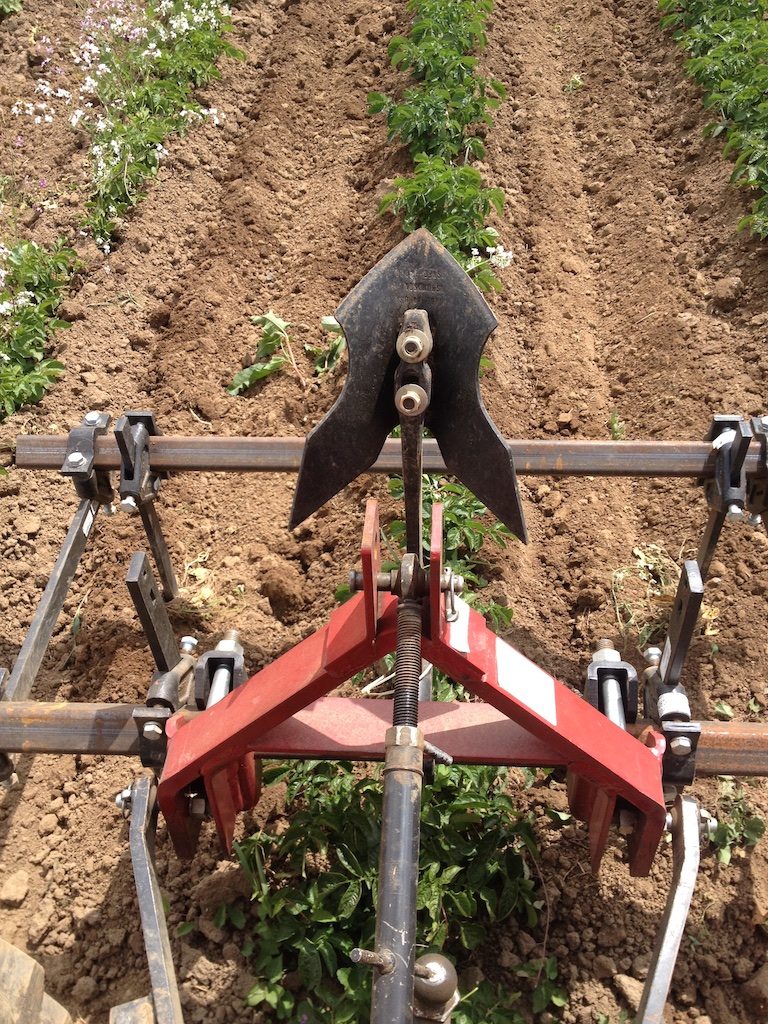
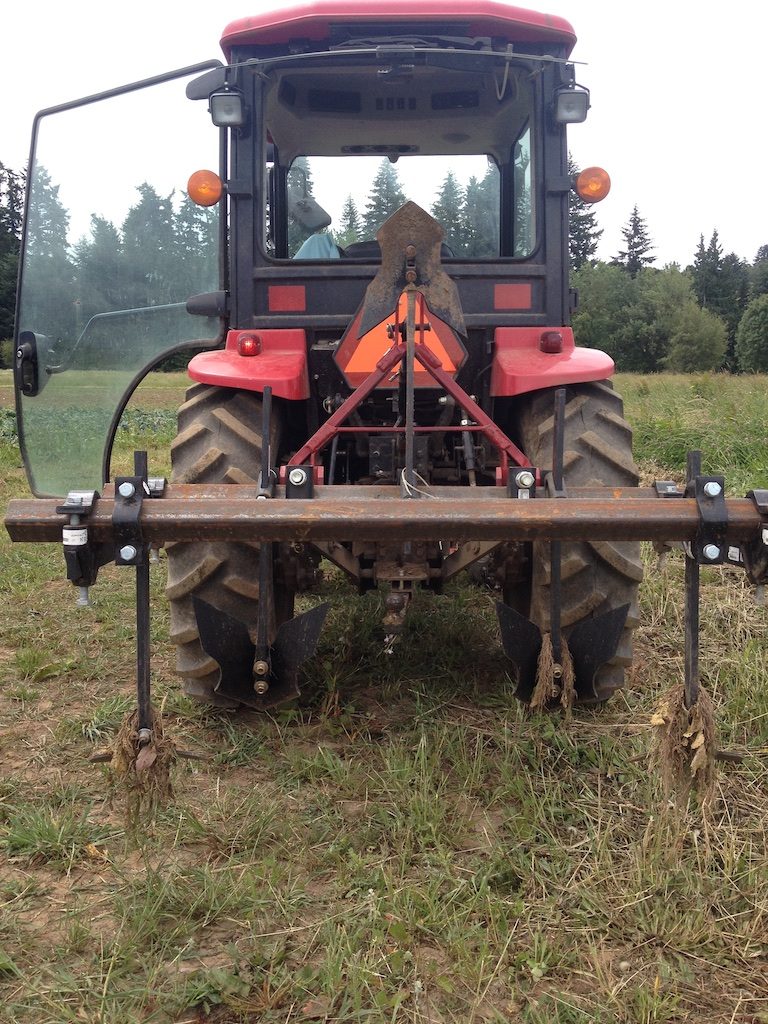
From the back of this 30 HP utility tractor. This is a simple double tool bar set up to hill potatoes, but that can also be used for crops like tomatoes and is easily reconfigured for other jobs.
The two photos above (one at the start of the post and the one immediately above) show the same tool bar from two different angles, and I’ll include a photo below with yet another angle. On the outsides in the back are what I call sweeps and these are 9″ sweeps if I remember right. On the front bar there are two 12″ furrowers (people have different names for these same parts and there’s definitely variation in patterns from manufacturer to manufacturer). There is a third 9″ furrower that is mounted upside-down in the center. Mounting tools upside-down is a convenient way to store them completely out of the way when they’re not being used, especially if you might switch set ups out in the field.
The basic parts here are those “shoes,” meaning the furrowers and sweeps, the “shanks” that the shoes are attached to, the clamps that clamp the shanks to the tool bars. The bars themselves, which in this case are referred to as “diamond bar”, which is just square tube rotated 45 degrees. I’ve used four additional clamps with two straight shanks to offset the two tool bars and the front tool bar is mounted on a red A-Frame, which is the standard mount for a category 1 3-point hitch. The number after “category” refers to the sizes of the 3-point hitch, but category 1 is the most common size on small farms, sometimes category 2 when you get up into the 50+hp range, or category 0 if you have a really small tractor. If you have a really old tractor it probably has some other implement mounting system as the three point hitch wasn’t common until the 1960’s.
A strange note on diamond bar is that many clamps are made for 2 1/4″ diamond bar, but 2 1/4″ is not a standard size square tube that most steel yards carry so you usually are better off using 2″ for smaller tractors, and that usually works with most clamps. Some clamps work better with 2 1/2″ and that’s more appropriate for very heavy soil and wide tool bars. Most tool bars are hollow (a.k.a. square tube), with at least 1/4″ or 3/8″ wall, but when extra down pressure/weight is needed sometimes solid bars are used. They are extremely heavy and proportionally more expensive as plain steel is essentially a commodity sold by the pound.
There are lots of variations on all of these parts, especially the shanks, so you want to make sure when you’re buying the separate parts that they’re all compatible. Usually there’s quite a bit of cross compatibility. The shanks for the sweeps and furrowers have a special end for mounting the shoes on them and they need to be mounted with special bolts called “plow bolts.” These usually aren’t available at hardware stores anymore so you’ll need to get them from the same dealer you get the shoes and shanks from. Using a flat washer and and split washer on the back side of the shank with the nut for the plow bolt will keep the nut from vibrating loose.
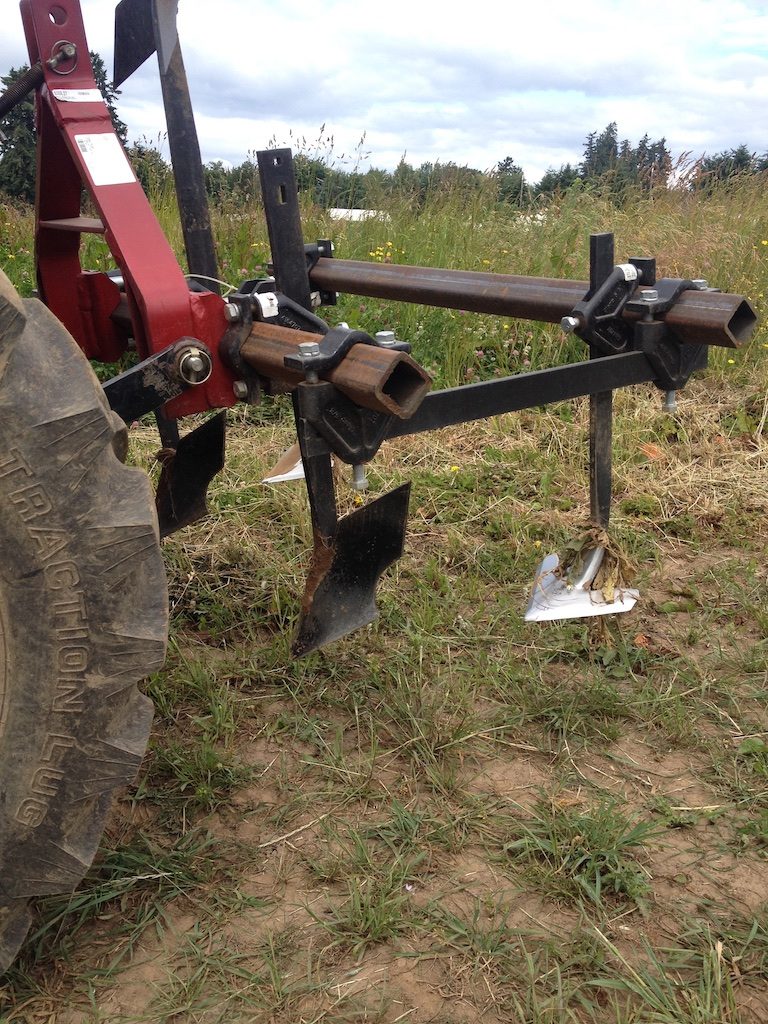
Another view of the tool bar from the side
This particular set up was for hilling potatoes. The plants at this point are still short enough that they might touch the underside of the tractor, but they’re not going to be damaged by that contact. The two 12″ furrowers are pointed and have plow like wings that direct the soil that is dug by the points up and off to the sides. The sweeps are flatter and don’t have wings so while they still dig a bit and move some soil to the sides, most of the soil flows over the blade.
The way this tool bar is configured the furrowers are moving soil into the row of potatoes, hilling them up. This buries weeds in the row, and also cuts, or drags weeds out of the path of the furrower, killing those too. The furrowers are also moving soil into the pathway, but the sweeps are following so they cut and drag weeds out of that path, and help flatten the pathway back out.
As you can see there was trash in the field and it’s now hung up on the shanks. The chevron shape of the sweeps helps move most of the trash off to the side, but when it hits trash straight on it can get hung up. Depending on the speed and depth that the sweeps are run at, and the width of the sweep, they will have an effect on a swath of soil that is significantly wider than the sweep itself. I usually consider a 9″ sweep to cultivate a path about 12-4″ wide, and a 5″ sweep a path about 9″ wide. Going slower and shallower makes this narrower, faster and deeper makes it wider.
In general I find it better to use more smaller sweeps rather than fewer wider sweeps, but to offset them, alternating between the front and rear tool bars and to overlap them slightly to make sure you cover all of the ground. This offsetting front to rear leaves gaps in the front row and the back row and those gaps allow any trash or clods to flow around, while still killing all of the weeds. It also leaves a flatter surface, and is less stress on the individual shanks and shoes.
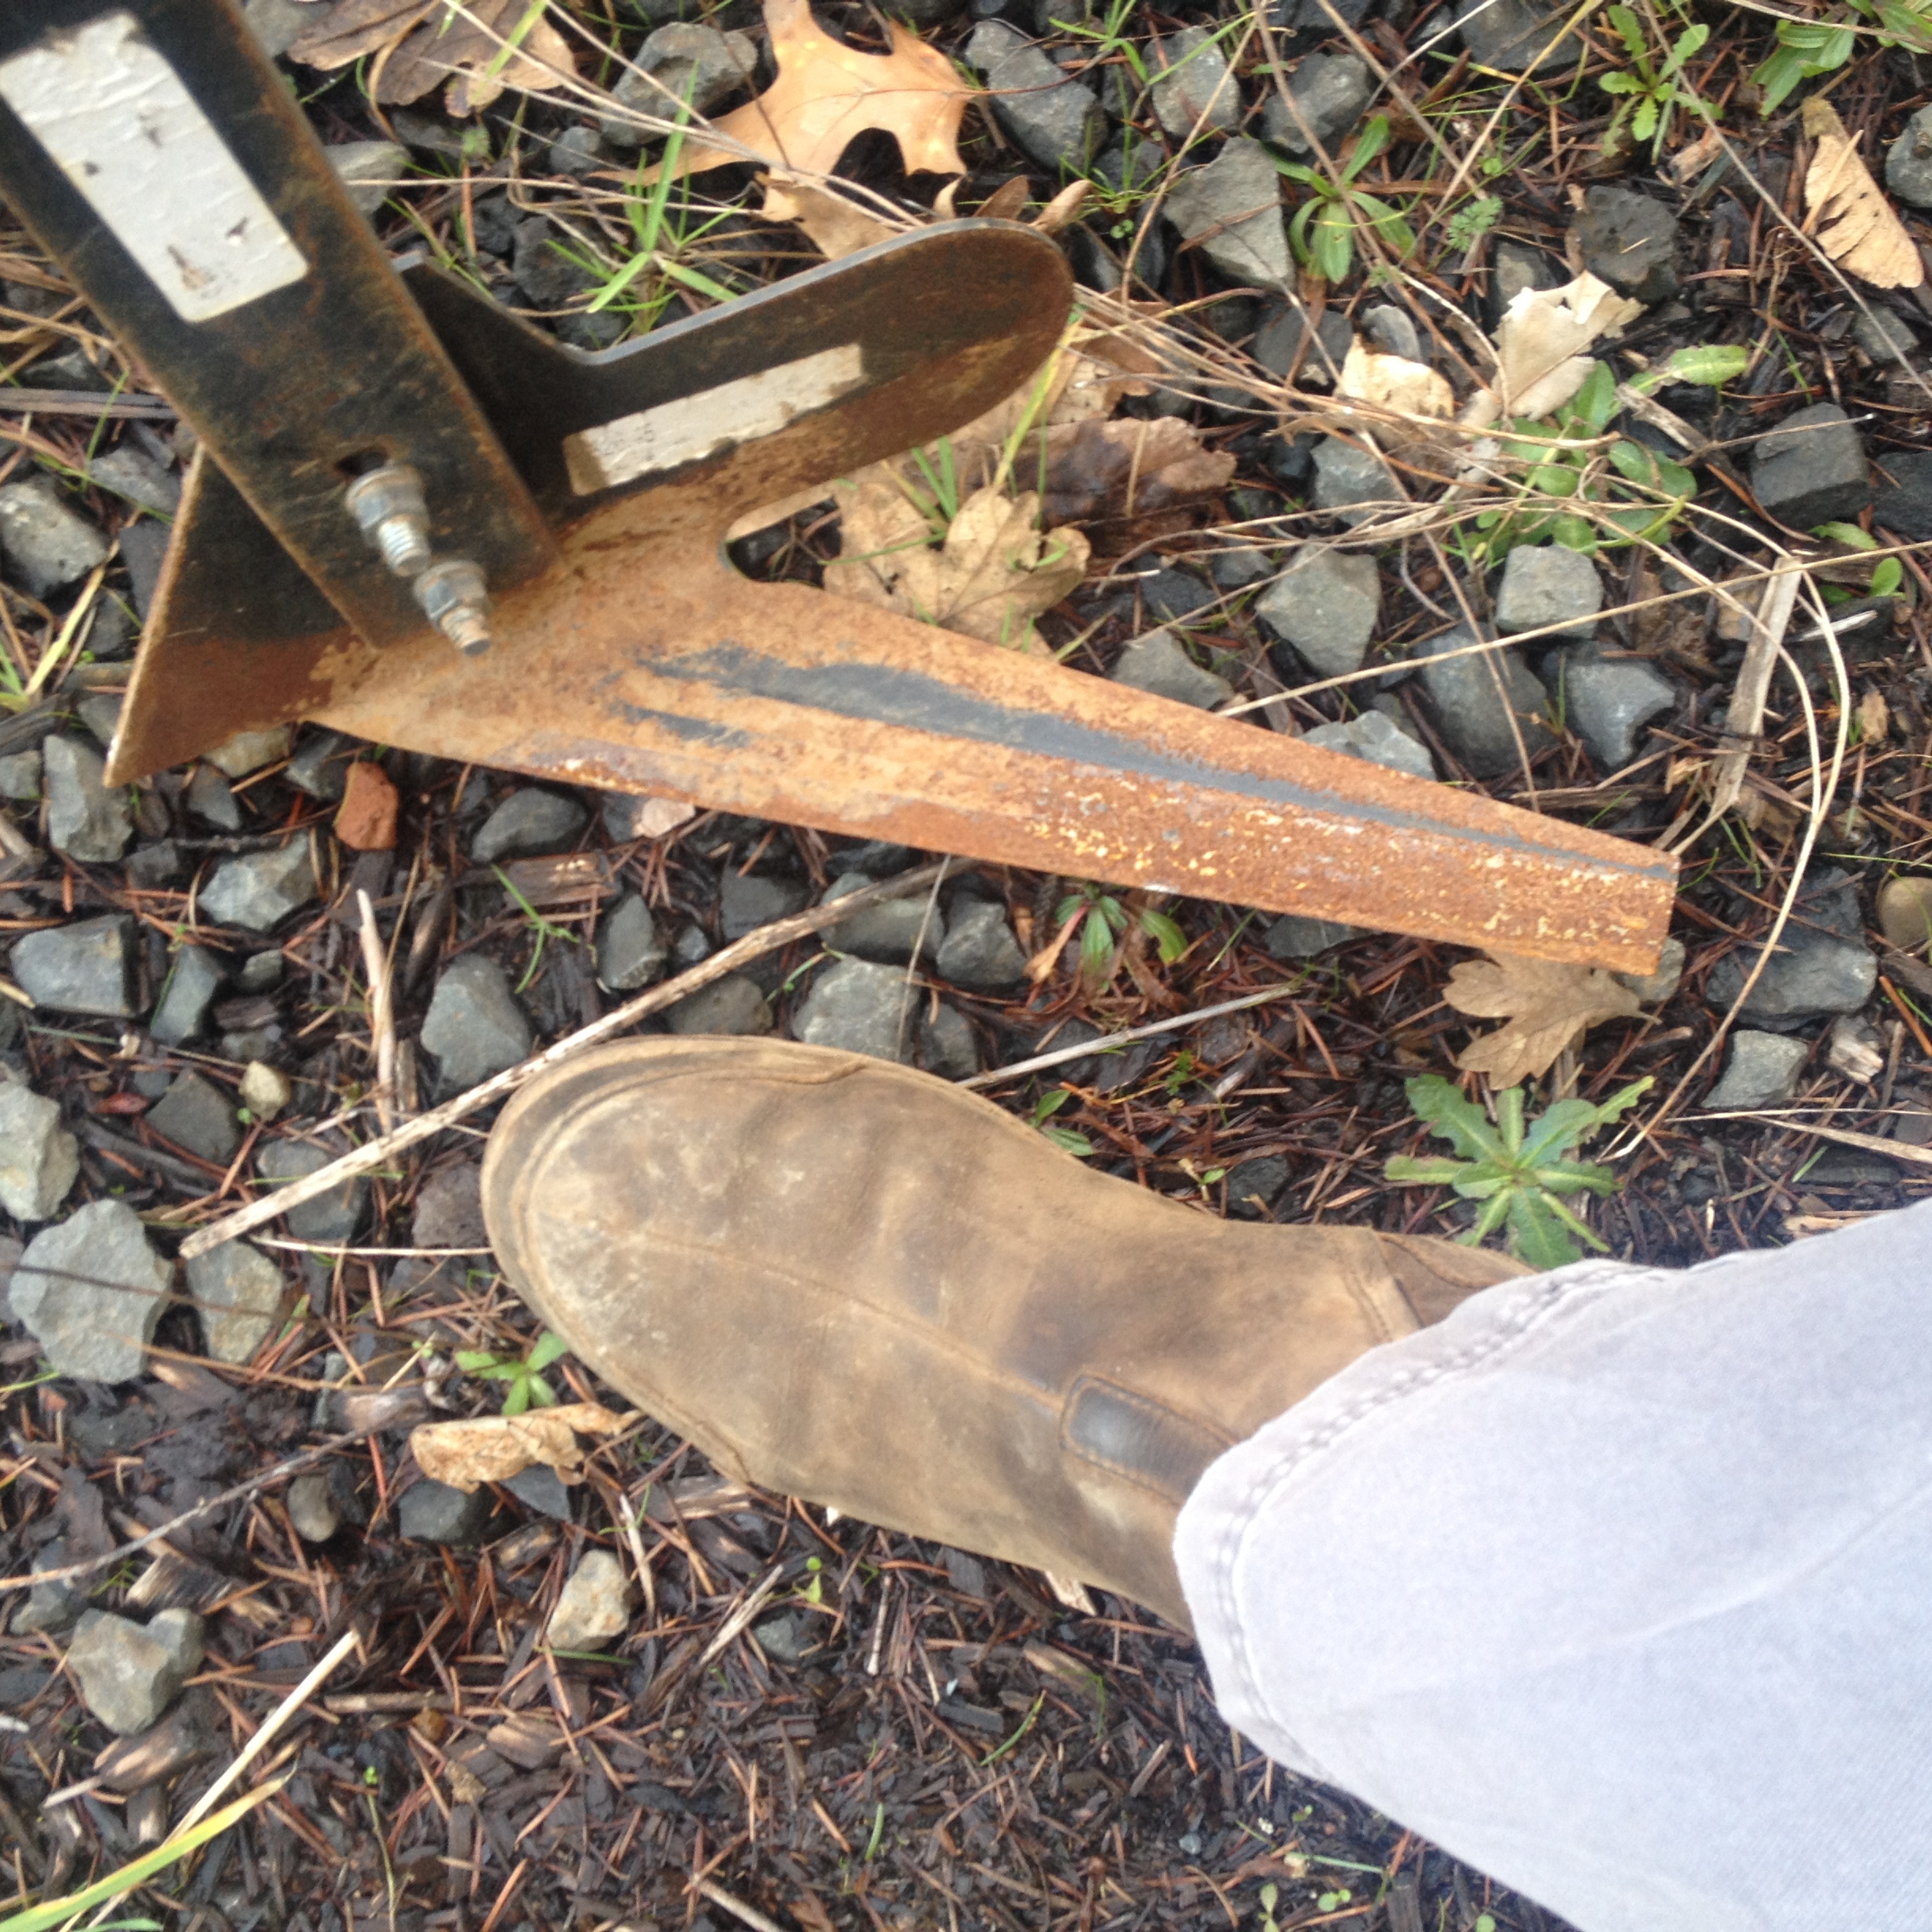
Side knife with my foot for scale. This knife is rusty as it’s been out of use for a bit. In general the rust will usually wear itself off with use within a hundred feet of use or so and the knives and sweeps are pretty much self sharpening so I just leave them as is and only clean them when they have a lot of caked on soil. They do work much better, especially in slightly wet conditions when they are shiny, so a protecting them between uses by scraping and wire brushing off soil and then protecting them with a coat of grease or heavy oil, or even a layer of paint isn’t a bad idea (a common practice on plows) and will help them last longer. If you use grease or oil you should wipe it off before taking the blade out in the field, paint will wear off in the field.
Another kind of tool that’s a little different than the standard sweeps and furrowers is a side knife, sometimes also called a beet knife. On the same tool bar shown above I can swap out the furrowers for side knives. If the knife is angled away from the row, with the shield running a few inches from the row of plants, it can be run just an inch or so under the surface and will move a little soil away from the plants, taking out weeds at the same time. For a single row of something like kale, or cabbage, or small tomato plants, this leaves a narrow strip of in line weeds just a few inches wide to clean up with a hoe. When the plants are a little larger I can turn the knives around so they move soil into the row, slightly burying the bases of the plants, and burying small in row weeds. Again, I run the sweeps in the pathways to keep those clean.
Making Adjustments
There are a number of ways to adjust the shanks, knives, and tool bars. I’ve talked a little about the position of the shanks and shoes on the tool bar, alternating between the front bar and rear bar, and overlapping the pathways a bit to take out weeds. To start, I usually leave a 5-7″ gap where the crop plants will pass through, or more for someone just starting out. The gap needs to be wide because it’s impossible to drive completely straight, although you will get better at this with time and dedicated cultivating tractors with belly mounted implements can help you get a little closer. The other reason the gap needs to be there is because the tool will throw a little soil into the gap, making it narrower than the way they tool is actually set.
Vertically I usually set the shanks about 3/4 of the way extended. Shorter is stronger and stiffer, but reduces the clearance for the plants passing under the tool bar. Fully extending the shanks is weaker and more flexible, risking bending the shanks and also reducing the ground clearance when the tool is lifted out of the ground.
You may notice that on the potato hilling tool bar the pathway sweeps are set a little deeper than the furrowers for hilling. This is because in this particular case the potatoes were already hilled a bit and so the path ways were lower than the shoulders of the bed where the furrowers were running. In general running the tool within the top two inches, is best.
On some sweeps and knives you can adjust the angle of attack, either setting the point so that it angles down slightly, or up slightly. Setting it with the point down will help it penetrate hard soil and dig in more, setting it flatter works better in loose soil where you can run the blade evenly shallow without the tool jumping out of the soil and skipping sections. You can also change this angle of attack by adjusting the top link on the 3 point, but you’ll have to make further adjustments to the length of the shanks between the front and rear tool bars to make sure all of the tools are running at the desired depths.
Driving Considerations
When you’re driving a tractor with the tool bar off of the rear 3 point when you start turning left the tool will actually initially move right, and vice-versa. Turning much with the tool in the ground is a bad idea as it puts lateral forces on the tools, and they aren’t designed to take those forces which means you’re likely to bend or break parts. Turning slightly to follow a row is inevitable, and the only trick here is to do it as subtly as possible, paying very close attention and making changes slowly. You will quickly learn how much better this works when the beds are formed and planted straight, without wiggles or curves.
You also need to pay constant attention to how deep the tool is running and make small adjustments with the 3 point lift arms. You can add gage wheels to set depth but this adds a layer of expense and complexity when setting up the tool and doesn’t completely eliminate the need to pay attention to what the tool is doing.
Start by driving very slowly while you get used to paying attention to both how straight you’re driving and how deep the tool is at any particular moment at the same time, and how to adjust those things on the fly. Eventually it will become ingrained and you’ll be able to drive faster as the micro-adjustments needed become second nature.
If you have 4 wheel drive on the tractor, especially if you’re on a slight side slope (side slopes make everything trickier), putting the tractor in 4 wheel drive can help you keep the tractor straighter, but take it off for the turn arounds at the ends of the rows.
Drip Tape Considerations
Aside from the need to make sure the tools clear the header at the beginning of beds, I’ve never had trouble cultivating with drip tape in place. Part of the trick is to make sure that the tape is straight before you start cultivating. The only other trick is to just pay attention and make sure you never snag it, and if you do you stop immediately and sort things out. For the most part the tools run under the tape and never touch it. (This is not true for rolling cultivators, which I’m intentionally not talking about here.)
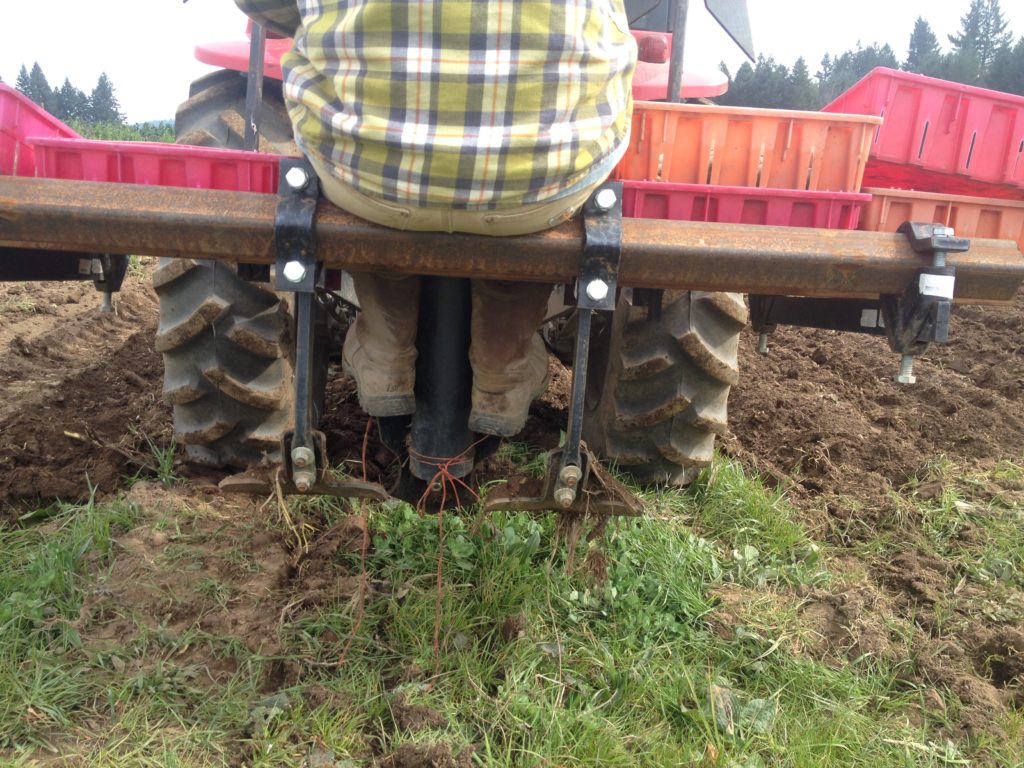
Setting the Toolbar Up for Planting
The same tool bar set up for planting potatoes
By moving around a few of the pieces the same tool bar I showed above can be used to plant potatoes, and potentially other crops as well. The center furrower is now dropped to create a furrow for dropping the potato seed pieces into. The two larger furrowers are flipped because they’re not in use, and the sweeps are moved in tighter to full the furrow back in after the seed pieces have been put in the furrow.
The view from directly behind
If you look closely at the photo you can see that a 4″ ABS pipe is tied to the back of the shank of the furrower. Seed pieces are dropped down the pipe and if you’re using 12″ spacing the lugs on the rear tires are conveniently 12″ apart, meaning you drop a piece every time a lug on the tire rolls past some set point on the tractor.
A board sits between the tool bars and acts both as a seat for the planter and a place to stack totes of potato seed pieces. You want to have excellent communication between the planter and the tractor driver to make sure that everything runs smoothly and safely.
For more ideas and lots of photos of cultivation tools I have a photo page with lots of captioned photos of tool bars, cultivation tractor set ups, and even hand tools here.
If you’ve been here before you know the site just changed radically. This has been coming for a while. In the short term I’ve taken down a lot of the articles and links and I’m sure there are more links broken than I know about.
I’m working on getting all of the previous content back up in a more searchable form. If you find broken links within the site please let me know.
I’ll try to make updates on the progress in this post, and I’ll take this post down when I’m finished (which probably means never).
Thanks for your patience with the update. If there’s something specific you’re looking for email me and I’ll try to prioritize it.
Roll up end wall on a tunnel at Our Table Cooperative in Sherwood, OR
Spurred by a question in a farming group on Facebook asking about end walls that allow tractor access I thought I’d outline a few of my preferences, and tradeoffs with different designs. Over the years I’ve seen a lot of hoop house and greenhouse end walls and I’ve built quite a few as well. The photo above is the most recent design I’ve used. It’s my most recent iteration of a longstanding roll up end wall and was inspired by some of the designs below. It’s relatively cheap and easy to build and use, and it allows full access to the house with a tractor.
Here in the Northwest we’re not worried about extreme low temps so the vent at the top of the end wall isn’t designed to seal super tight, but it activates automatically with a wax cylinder opener and is very, very good at keeping the tunnel from overheating in the early spring when we go back and forth between sun and clouds all day long and we don’t want to leave the ends rolled up. The “hinge” is just two bolts on either side of the frame.
The posts on the outside of the rollups are important to keep the door from swinging dangerously in the wind. Most of the winter the sides of the door plastic are just wiggle-wired to the full frame. The wire comes off when we start rolling up the door. To access the house there is a small door framed in the side wall (barely visible on the far side of the house). Yes, the door is only as tall as the vertical part of the wall so you have to duck to get in unless you’re really short. The side walls are also roll up, but the one on the far side only rolls up to the door, stopping a bit short of the end of the wall. This little access door saves a lot of wear and tear on the roll up, and makes access much easier when the end wall is rolled down. I think the biggest problem so far with this design is that the little wooden “roof” from the supports is a perfect place for yellow jackets to hang their nests. The one other slightly tricky bit is that you have to roll up the doors before rolling up the sides. Not really a big deal as that’s the way it usually works anyway.
The tunnel above is a 20’ wide low profile semi quonset type from Oregon Valley Greenhouse and is at Our Table Farm in Sherwood, OR. Below is a 30’ wide tunnel at Liberty Gardens in Pennsylvania. The roll up doesn’t quite extend to the corners of the house, but there’s still pretty good access.
Roll up end wall at Liberty Gardens in eastern PA
Not shown in the photo is a center post that they use to keep the door from swinging in the wind. For a 20’ opening in moderate winds I haven’t found it necessary, but I think it probably is essential for a 30’ opening. There is a piece of pipe driven into the ground that the support pipe slips down into and then it’s attached to the top of the door frame when they’re not actually using the tractor in the tunnel (or at least that’s my memory of how it worked). Doors like this are big sails, and with a little wind they can exert a lot of force on the supports so it pays to really secure them well. This can be really tricky in wet soil. I’ve had a lot of stakes I thought were secure wiggle their way out of the saturated soil over night with gusty winds.
Haygrove single tunnel end wall at Foxglove Farm on Salt Spring Island, BC
Here’s another version of a roll up end wall on a Haygrove single bay 3 season tunnel up on Foxglove Farm, on Salt Spring Island in BC. I put up this photo because this one uses extra heavy plastic on the door to reduce the effect of wear. It also uses their quick release clips with vinyl tape to secure the plastic, which is actually pretty secure, and does come apart easily (the tunnels are designed to be moved seasonally).
Removable end walls on permanent tunnels at Foxglove Farm
For their more permanent tunnels at Foxglove, Michael framed very light end walls that attach with a few bolts. The end walls have a light door in them, but when he wants to access the insides of the tunnels with the tractor the bolts are removed and two people can carry the end walls off to the side and lay them in the grass (this happens about twice a year).
Curtain doors tied up on a Haygrove tunnel
Another design that I’ve seen in a few places, and tried myself, is scissoring doors. I first tried these with some multi-bay Haygrove tunnels. It’s a cheap, “easy” design, but there are enough problems with it that I gave up. The primary trick is how to secure the doors from swinging into and out of the tunnel. Usually these doors have a piece of pipe that hangs from the center top of the end wall and can be tied up to the side wall when you want to open the door. The pipe needs to be secured at the ground when the door is closed, and sandbags were not nearly enough in our case, nor was a steel contractors stake driven 2’ into the ground, or a light T post that the doors broke after a few weeks of the wind tugging on it. Tying ropes horizontally across the end bows about 3’ off the ground, both inside and outside the door did help, but we had to untie them any time the tractor was going into the hoop house. We gave up on the pipe and just used them as curtains for a little while (shown in the photo from Sauvie Island Organics, near Portland, OR circa 2006), but eventually we gave up on the end walls all together for these three season tunnels and just used the tunnels as giant umbrellas, which is what we needed most anyway.
A mobile tunnel at Four Season Farm in Maine with an end wall that scissors open.
When I visited Eliot Coleman in Maine in 2015 he was working with scissoring doors on his tunnels. I don’t remember the details of why, probably mostly for good air flow with something that was easy to access. His tunnels have a bar that runs across the opening so no good for tractor access (but he does the tractor work before moving the tunnel over the crop), but a perfect place to secure the scissoring pipes. At the time he was just using a bolt with a wing nut and had holes drilled in each of the pipes. It was a slick design, very simple and effective for his needs.
Eliot showing how the end wall opens. You can just make out the bolt (below Pierre’s hand) used to hold the doors in place when they are closed
I get questions from readers every once in a while and I keep a long file of ones that I think would be good to write about. Unfortunately I mostly don’t get around to answering, but I thought I’d take a stab at this one (from two years ago, yikes). I appreciate hearing that folks are actually reading what I have to say and that they’re getting something out of it, and it’s always amazing to me that the internet means my opinions are available in pretty much any corner of the globe.
I’m wondering if you’re interested in writing an article about what to do when things do not go according to plan. I’ve been thinking it’s the one topic that nobody covers, but in farming there are so many things we can’t control. I’m thinking – too muddy to hoe, storm kills seedlings etc. Be interested to hear your process for decision making in difficult times. Anyway, thanks for all you share, Esther Pickle Creek Farm Sydney, Australia
(note- This was so long ago that Esther isn’t actually at Pickle Creek Farm any more, but she did come visit on a tour of US farms last summer so I got to meet her in person as she helped us tie up young tomatoes.)
My quick reply to Esther at the time was that I don’t think there’s actually a straightforward answer to how to make decisions on the farm in difficult times and perhaps because it’s so complicated folks don’t write about it much. I’ll think out loud here a bit and maybe some part of my thoughts will help one of you out there reading this.
I’m a planner, I plan out my farm seasons week by week a full year in advance. Notice that I write “week by week” and not “day by day”, or “hour by hour.” It’s good to have a plan, for me it’s indispensable, but I come into the season realizing that the plan doesn’t include every detail, and that it has to be flexible. On the farm my weeks have usual flows, meaning harvests happen on certain days at certain times, creating weekly to do lists and records usually happen on certain days, plantings and cultivations have typical times that they happen.
Following the plan made at the beginning of the year everything is further prioritized on the actual week it’s planned for and is continuously reprioritized as more information comes in on actual field conditions – if only in my head. There’s a lot of strategizing and observation constantly happening as I’m working. Market times, whether that’s CSA pick up, a Farmers Market, or a restaurant order delivery, are usually pretty set and don’t have much flexibility, but even those can change when things get extreme if needed and that’s good to keep in mind. Harvest sets up successful markets so that tends to be the next priority for me. Good cultivation, irrigation and field maintenance sets up good harvests so that is usually my next priority.
Planting usually comes after all of those and if I miss a planting it’s a problem so I try not to do it. I work hard to set myself up so that everything else gets done so I can plant. In terms of prioritizing, I’m usually focused on the crops that will take the least amount of labor and expense going forward to get to market. To belabor the point, I’m not thinking about the sunk cost here, the amount of time and expense that already went into a crop, I’m thinking about the amount of expense remaining and potential returns when prioritizing. Within plantings I almost always prioritize plantings of crops that have successions to keep the succession of harvest as even as possible. For one time planted crops I’m more likely to put off plantings if other things need attention and assuming the weather looks cooperative and any seedlings look like they’ll survive.
To go back to that point about sunk costs one more time, always move forward, you can use the past to inform your decisions, but you can’t go back and change the past. In decision making about a current crop, the future expenses and potential returns are all that matters, not what it has taken you to get to whatever point you’re at. Look at costs and returns in a wholistic way, take into account how much extra weeding will be involved with saving a crop and if the potential harvest will pay for it; if you’re four weeks late planting beans, will you have the labor available four weeks after you originally planned on harvesting them; if you need to work up a field that just won’t dry out what will that do to the soil texture for the next year, or five?
When things go wrong, like it rains for a week straight, or two, it means something that needs to happen isn’t going to, or at least it’s not going to happen at an ideal time or in ideal conditions. Part of the calculus is thinking about the consequences of not doing each one tasks involved and how those consequences will propagate out over the rest of the season, and even in future seasons. In the simplest terms, it’s then just a matter of giving up on whatever task is going to cause the least impact into the future.
The only way I can think to make a general statement on how those decisions get made in a timely manner is to say “with experience.” Experience helps in multiple ways and there is no substitute. The more experience you have as a farmer the more likely it is that you’ve seen some variation of this same problem in the past and so you have at least one experience of how it plays out. The more experience you have the more practice you have prioritizing and the less time it takes to prioritize effectively.
One way to practice more, and build up a certain kind of “experience” more quickly than just waiting for season after season to pass is to study farming: read farming journals and books, visit farms, talk to other farmers, go to conferences and hear what other folks are doing, and especially what has worked in the past, under what conditions and why. Another way is to plan, and while you’re planning keep in mind contingencies. Every good plan is made with realistic conditions in mind. If you’re planning on planting into a field the second week of April, how likely is it that that field will actually be ready the second week of April and that the weather will cooperate? What are the consequences if it’s not ready, what are the alternatives. These are all things you can think about in advance and winter, for most of us, is a perfect time to spend time thinking about these things – practicing farming, practicing decision making and prioritizing, stocking up on options and contingencies before we actually need them.
If the plan is “perfect” it has enough built in contingencies that all of the decision about what to do are already addressed. No plan is perfect. Plans that acknowledge the limits of planning are much better than ones that don’t though – that’s why in the winter I only plan out plantings by the week, not by the day. I know I’m not really going to know what day is going to be the best to plant six months in advance, but I can get the week right most of the time, and then decide on the actual day when the time comes closer. To continue using planting as an example, I also know the steps for setting up a successful planting and so I’m proactive in watching the weather, watching the soil, moisture, and flora to make small adjustments as the time for planting gets closer. I’m willing to compromise on being “perfect” and accept what I think is merely acceptable when that’s the best I can do.
For me, planning and strategizing is happening continuously on different levels. It’s paired with, and informed by careful observation of and record keeping on what actually happens, and that includes not just the pieces I have some control over, like when a seed is seeded in the greenhouse, but also the natural surroundings that I have no control over and their patterns and lack of patterns over time.
Farmers at the 14th Annual Northwest Vegetable Farmer to Farmer Exchange
In January I somehow came across a Facebook post from Steve House, a well known Alpinist and Patagonia climbing ambassador.
I have to admit I was nervous about mentoring young, technically capable climbers and alpinists when I started in 2012. What could I teach them if they already know how to swing an axe, cross a glacier, and rig a rappel?
I learned that experience in the mountains is a way of seeing. A way of knowing. And gaining that experience is painstakingly slow UNLESS someone shares their intuition, their judgement with you.
A seasoned climber looks at a route, and sees solutions, options, obstacles, present dangers and so much more. The novice looks at the same mountain and sees the route itself, but maybe little more.
Perfect, and it came at a time when I was questioning my value as a consultant and a mentor.
January and February brought back to back to back events putting me on both sides of this equation. One of my long time mentors has been Michael Ableman, and in January he invited me to participate as one of the younger farmers in the second version of a meeting of Agrarian Elders. The initial event in 2014 was a discussion between elders of the organic farming movement, farmers who have been pushing the movement forward for forty or more years. At the second version roughly half the elders returned, bringing a younger farmer each, and I was fortunate enough to be one of those who had the opportunity to literally sit at the feet of the elders and listen for a week.
The following week I returned to Portland and was invited to talk to an introductory design class at Portland State University that a friend of mine was teaching. She promptly introduced me as one of her mentors and a leader in the local farming community, something I wasn’t expecting at all, but made sense in the context as I was at least 20 years older than everyone in that class, and a few years older than my friend, who I’ve known for more than a decade now. It was a surreal reversal.
The next week I headed down to Breitenbush Hot Springs for an annual retreat with farmer friends from around the Northwest. Spring training camp for farmers as Robelee Evans, farmer, baseball fanatic, and one of the organizers and instigators behind the event described it. I’ve been a part of that group for 13 years, one year shy of the start. Partially because I was one of the youngest farmers when I started coming, and I didn’t start coming until the second year, I’ve always kind of though of myself as one of the younger, newer farmers in the bunch. This year I had the strong realization that my role there is changing, and I’m now a bit more solidly in the middle, with many farmers I look up to still there, but also many farmers who are relative novices.
I’m starting to embrace my status as a more seasoned farmer, but I still have many mentors with many more seasons under their belts and I listen intently to their intuitions and judgements and I try to understand them in the context of what I’m seeing and experiencing myself on the farm, and in my life.
I’ll try to make time to post a little more regularly this year, perhaps monthly, perhaps a bit more. I’m also working on setting up sites to offer a little more insight into the gatherings at Esalen and Breitenbush. The topics discussed there and resources shared are important and I think we all want to make them more accessible to the larger public.